Tuesday, June 28, 2011

Cappuccino Oreo Cake


Ever since I saw this cake over at I Am Baker I've been dying to cover the outside of a cake with Oreo cookie crumbs. Seriously, it's been keeping me up at night. I do that, obsess about baked goods in the middle of the night. I'm weird. A couple of weeks ago I needed to thank a friend and it was just the excuse I needed to make this cake. Here's the story.

My daughter, who has never swam competitively, has decided to go out for the High School Swim Team this coming school year. I'm so proud of her for trying something new. But, being as she has never swam competitively, she's a little behind on some of the necessary skills. Some work is in order. My dear friend Beth just happens to be the most awesome swim teacher around. And, although, she usually teaches younger kids how to swim, she graciously offered to help out. My daughter and her have been working in the pool on flip turns, backwards flip turns, proper stroke from, the whole sha-bang. Beth has done such a wonderful job. She has a great knack for finding the perfect balance of challenge and encouragement. It's been great. When I asked how I could thank her, I mean really thank her for her hard work, She said "Bake me a cake." This could be no ordinary cake. It had to be awesome, and, to toot my own horn, I think it was. "Toot, toot!"

I started off by making an 8-inch round, 2 layer chocolate cake.
Check out this post to see how.

Then I made my favorite Easy Meringue Buttercream icing. See how on this post.

And flavored it using this gooey concoction of 3 tablespoons instant coffee and 2 tablespoons KahlĂșa. I use this to flavor any and everything with delicious coffee flavor. Cheesecakes, shortbread, Nanaimo Bars, you name it. It gives the most intense yet smooth coffee flavor. If you don't want to use the booze, just use water or coffee.

To assemble the cake I started off with a whole package of Oreo cookies. I split one cake layer in half and left the other whole. I started with one half layer. Laid on a 1/2-inch of coffee buttercream then sprinkled on some coarse chopped Oreo cookies and pushed them down into the icing.

I covered that with a thin layer of buttercream, just to fill the gaps and topped it with the whole cake layer.

Then repeated the filling and topped it off with the remaining 1/2 layer. This is coming together nicely! Seriously, chocolate, coffee, Oreo cookies, what can go wrong!

Then a generous slathering of buttercream on the outside, smoothed out to perfection. More detail on how to fill and ice a cake can be found on this post.

The remainder of the package of Oreo cookies went into the food processor and were ground very finely and dumped into a big bowl. Balancing the cake in my left hand, I held it over the bowl and scooped the crumbs up in my right hand and pressed them against the side of the cake, letting the excess crumbs fall back into the bowl. This was pretty messy and took a few turns around the cake to get it covered. Then pressed a few handfuls on the top, brushing off the crumbs very carefully.

I finished it off with a shell border around the bottom and an Oreo cookie on top. I made this the night before I gave it to Beth because I wanted the cookies to get soft and absorb some of the moisture from the buttercream. If you want the cookies to be more crunchy then make it the same day you plan to serve it. The longer is sits, the softer the cookies will get. I recommend storing it in the refrigerator until about 45 minutes before you plan to serve. Yummy!


What you'll need to make this cake:
2 8-inch layers of chocolate cake. (one split in half)
3 T. Instant Coffee
2 T. KahlĂșa (coffee or water)
1 Package Oreo Cookies

Monday, June 20, 2011

Cinnamon Rolls


For a couple of months now I've been in search of the ultimate cinnamon roll recipe. I've tried several. Most are just OK. I even made Pioneer Woman's recipe twice because I thought I got it wrong the first time. And please forgive me Pioneer Woman, but I didn't really like them. I really, really like a lot of your recipes, just not the cinnamon rolls. I think it's because I prefer brown sugar and her recipe uses granulated sugar. I also wasn't digging the texture of the dough, a bit heavy and dense for me. She and I will just have to agree to disagree on this one. (By the way, Pioneer Woman has no idea who I am!)

Now I have to confess, up until recently I've been a bit intimidated by yeast risen doughs. Mostly because I usually avoid those recipes and really don't have much experience with them. The reason is two fold. First, I've never had a desire to bake homemade bread. I've never felt the lure of the bread machine. I'm just not a big bread person. My 2 or 3 attempts at bread and rolls have not been great.  I am sure homemade bread is far superior to store-bought but store-bought bread suits me just fine. "And that's all I've got to say about that!" (Name that movie.) Second, I've never had the patients for kneading, rising, and rising again. When I want a treat, I want it now! Seriously, the 25 minutes it takes to bake brownies seems like FOREVER! 

However, as of late, I've begun to realize that there's a whole world of wonderful yeast raised baked treats waiting to be discovered. And I need to get exploring. I've also got a bit more patients these days, one of the few advantages of age. It started with the Zombie, which turned out great and gave me the confidence to try more. Then came the King Cake, another success. Hey maybe this isn't as hard as I was making it out to be. Now on to cinnamon rolls, I hope you'll agree that they are a success as well. Enjoy!

This recipe starts with the same dough from the King Cake. Go to Gesine's blog here to get the recipe (you won't need the pastry cream, egg whites or glaze) and follow the step by step directions (just for the dough) here up to the point of letting the dough rise and double in size. NOTE: When I made the King Cake I used bread flour from the bulk bins at my grocery store and had to add the extra (6th) cup of flour. This time, I used King Arthur Bread Flour and only used the 5 cups of flour that the recipe calls for. You'll just have to judge for yourself if the mix needs the extra flour. 
OK, so the dough is now proofing. . .


Start by generously buttering 2, 9x9 or 8x8 pans. This may take 2-3 tablespoons, really slather it on.  (I'm showing a 9x13 pan but figured out in the end that 2 square pans would be better)

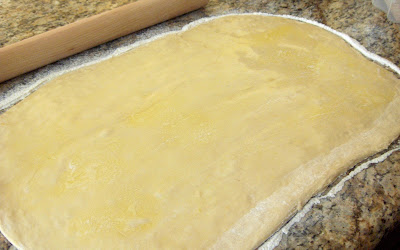
After the dough has doubled in size, punch down and roll out, on a generously floured surface, to a 16 x 24-ish rectangle. It should be just under 1/4-inch thick.

Spread with 1/2 cup melted butter, leaving about a 1/2-inch margin along the long side closest to you.

Next sprinkle with 1-1/2 cups brown sugar (light or dark, your choice.)
Then a liberal sprinkling of cinnamon. I like a really cinnamony (OK, if that's not a word, it should be!) cinnamon roll so I used a lot.

Now start rolling, in a pretty tight roll, starting with the long edge farthest away from you and rolling towards you. If there is a lot of flour on the backside of the dough, brush it off before you roll it over.

Pinch the edge to seal the roll and again, brush off any excess flour.

Slice the roll into 18 pieces about 1-1/4 to 1-1/2 inches wide. Then lay the rolls in the buttered pans, 9 to a pan (3 x 3). Leave some space between the rolls. See, I figured the math out after the fact and only had 17 slices so I jammed the extras into a loaf pan. Not sure what I'll do with that later. You'll do better than me with 18 slices and two square pans. Trust me!

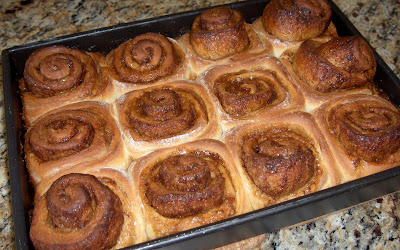
Loosely cover the rolls and let them rise again, for about an hour, until doubled in size. Then into a preheated 350°F oven for 20-30 minutes until golden brown (or a bit darker, like I like them.)

Yummy, it's taking all of my will power not to dive in and eat them right now, hot out of the oven. But if you want to ice them, then let them cool.

For the icing, mix until smooth, 2 oz. cream cheese, 1 tablespoon maple syrup, 1 tablespoon coffee and 1 cup powdered sugar. If you taste this now, I'm warning you, it's a bit different, but I promise it is a great compliment to the cinnamon rolls. Drizzle it on the cooled rolls and dig in. I like just a light icing on my rolls, if you like more, you may need to double the recipe.


Cinnamon Rolls

1 recipe King Cake dough from "Confessions of a Closet Master Baker" blog (find it here)

1/2 C. melted butter
1-1/2 C. brown sugar
Cinnamon (up to 1/4 cup, if you like A LOT of cinnamon)

2 oz. softened cream cheese
1 T. maple syrup
1 T. coffee
1 C. powdered sugar

Generously butter 2 9x9-inch or 8x8-inch pans.
Make the dough according to the recipe and let it rise until doubled in size.
Punch down and roll out, on a generously floured surface, into a 16x24 inch rectangle.
Brush with melted butter, leaving a 1/2-inch margin on the long side, closest to you.
Sprinkle with brown sugar and cinnamon to taste.
Roll up, in a tight roll, starting with the long side farthest from you and rolling towards you, brushing off excess flour as you go. Pinch the seam to seal.
Slice into 1-1/4 to 1-1/2 inch slices and lay in the pans with a bit of space between the rolls. 9 rolls to a pan, 3 x 3. Cover loosely and let rise until doubled in size.
Preheat oven to 350°F and bake for 20-30 minutes until golden brown. Let cool.
Blend cream cheese, maple syrup, coffee and sugar until smooth and drizzle over rolls.
Makes 18 rolls.


Tuesday, June 14, 2011

The Basics: Royal Icing


Royal Icing can be tricky. Mostly because you have to be very careful with the equipment you are using. The ingredients are pretty simple, it's the procedure and equipment that are the keys to success. Royal Icing is great for make ahead decorations or "run-in" designs. Once dried, it is hard and crunchy and will keep for a very long time. (Although I wouldn't recommend it.) It isn't creamy or flavorful so I only recommend it for decorations, flowers, and cookie decorating. The only flavor it has is "sweet", unless you add some extract to it (but NOT oil based flavors, I'll go more into that later.) It works really well on rolled-out sugar cookies because it dries hard and you can stack the cookies together without messing up the decoration. Lastly, once dried it doesn't need refrigeration. 

About the equipment. Royal Icing owes it structure and texture to the egg whites, which are protein. One tiny bit of fat (yoke), grease, oil, butter etc. will cause the structure of the protein to break down and you'll just get a soupy mess of egg and sugar. Plastics are a by product of petroleum distillation, which means they are polymers derived from oil. Whenever you use a plastic utensil or vessel for anything that contains fats or oil a small bit of that fat/oil will bond (on the molecular level) with the container or utensil. That's why you can't get those spaghetti sauces stains off your plastic. Make sense? So what does that mean when making Royal Icing. It means that you need to be certain that nothing you use (bowl, spatula, whip, icing bag, icing tip, etc.) has any traces of fat on it. For glass and metal equipment, just simply wash in very hot soapy water, rinse in a vinegar-hot water solution and then rinse again in just hot water and let dry completely. For plastic equipment you have to be certain it's never ever been used with anything that contains fat or oil. If you don't make Royal Icing often, just stick to metal and glass equipment. I make Royal Icing quite a bit, so I have bought a set of spatulas and serving savers and marked them "ROYAL ONLY" with a sharpie marker. OK, enough with the science lesson, I think you get it, so let's get started.

Here is all you need: Powdered Sugar and egg whites. I like the powdered ones because there isn't any chance of contamination by bacteria or egg yoke (fat). One itty bitty bit of egg yoke and your icing will not work. Wilton and Ateco make "Meringue Powder" which a lot of people like to use. Wilton also has a product called "Color Flow" which leaves a shiny finish when dry. They will all work with the procedure below but they have other ingredients/additives in them that aren't really necessary and that I'm not interested in having in my icing.

Start by putting your egg whites and powdered sugar in a mixing bowl with the whip attachment.

Add water and whip until thick and creamy. This can take 7-10 minutes. This is where you'd add flavor if you are using it. Make sure the extract isn't oil based. Lemon extract or lemon juice work well. Vanilla works but will give your icing an off-white color.

It's done when it holds a peak or the marks left by the beater for at least a count of ten. OK, that's it, you are done making the icing. Super easy! Now here's how to use it.

I was making a bunch of small drop flowers to decorate the tops of mini cupcakes and I needed 4 different colors. Divide the icing into 4 grease free, containers.

Royal Icing tends to form a crust pretty quickly so I lay a bit of damp paper towel right on top of the icing.

Cover with a tight fitting lid. Keep them covered at all times. Use gel (NOT OIL BASED) colors starting with just a small bit of color and adding more as needed until you get the color you want. NOTE: Icing will darken a bit as it dries so mix it just a shade lighter that you'd like.

To pipe, I like to use these disposable bags. And here I'm using a Wilton #2 tip.

Snip off the end of the bag and insert the tip, stretching the bag a bit at the end to make sure you have a snug fit.

To fill the bag, set it, tip down, in a glass and fold the top of the bag back over the glass. Makes for easy filling.

Scoop in the desired amount of icing. Then fold the top of the bag back.

Give the end of the bag a twist and wrap the tip with a damp piece of paper towel while you set up the rest of your colors and bags.

I needed to make uniform sized drop flowers so I printed out a bunch of circles (1/4, 3/8 and 1/2 inch) on an 8.5x11 piece of paper. Lay your template down on a flat surface. I'm using a particle board cake board that I got at the cake supply store but you can use the back of a cookie sheet. Securely tape a piece of parchment paper over the template.

When piping your flowers pinch the twisted end of the bag in the crook of your thumb to keep the icing from coming out of the top end. Squeeze with a downward motion (index finger, middle finger, ring finger) to send the icing out in the direction of the tip. Kind of like milking a cow. Like I've ever milked a cow, ha ha. You get the idea.

Start piping your flowers using the circles as a guide. I choose to use the 3/8 inch circles and pipe a 5 petaled flower with a white center.

Now just start piping away until you have as many flowers as you need. Probably a good idea to pipe some extras just incase some break, which a few always do. Set aside to dry completely. This takes about 24 hours and they should no longer look shiny. If you've made something a bit thicker let it dry longer. Once completely dry they can be stored in a zipper bag (a couple of weeks or more) until you are ready to use them. Careful, they are delicate and can break so store them someplace safe.


Royal Icing
3 T. dried powdered egg whites
1 lb. powdered sugar
6 T. water

Beat all ingredients on medium speed until icing forms peaks. (7-10 minutes)
Cover tightly until ready to use. If icing separates re-beat before using.

Tuesday, June 7, 2011

Muddy Buddies®/Puppy Chow

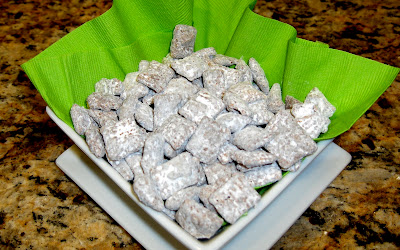
This fun snack goes by a couple of names. Officially it's called Muddy Buddies® but that name is a ® (registered trademark) so I don't think I can call it that. Hmmmm, not sure what the rules are. (Any lawyers out there? Can ya help a girl out?) Only I don't like calling it "Puppy Chow" because it seems to imply that your dog could eat it which is a big NO NO. It has chocolate and will make your pooch pretty sick. Also, we're not dogs (or puppies), so I don't want to eat something called "Puppy Chow". But whatever you want to call it, it's good, kids love it, and as sweet treats go, it's not too bad, us mom types don't have to feel too guilty about serving it. To be honest, I'm not a huge fan, I'm just not that into peanut butter. I don't dislike it, I just don't really like it. Kind of a "take it or leave it" thing. But my kids, their friends, my husband, and most people I know, like it. It's super easy to make and a great recipe for kids to whip up on their own. It has just a few simple ingredients which most likely you already have and doesn't involve the stove top or oven. (Just the microwave) So whatever you want to call it, make up a batch next time you need to feed a crowd. The full recipe can be found on either the Chex or Betty Crocker web sites. Go get it!

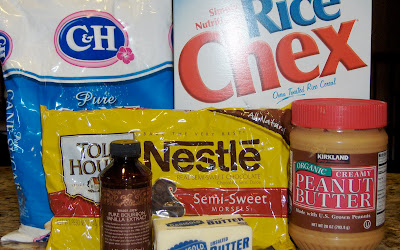
You probably have all this in your pantry right now: Chex cereal (any variety, I like the rice), chocolate chips, peanut butter, butter, vanilla and powdered sugar.

Start by measuring out the cereal into a really big bowl.
 Just so's ya know, my 13 year old made this recipe, I just took pictures. 
That's her lovely hand.

Next add the chocolate chips, peanut butter and butter to a microwave safe bowl and microwave on high for 1 minute.

Give it a stir and continue to microwave, 30 seconds at a time, until it's all melted together and smooth.

Add the vanilla and stir in well.

Pour the chocolate-peanut butter mixture over the cereal and mix well. At first it doesn't seem like it will coat all the cereal but just keep gently mixing. (be careful not to crush the cereal). Try to find all those pesky hidden globs of chocolate and get them all mixed in good.

Nice, all coated and ready for more sugar. Yea!

Dump the powdered sugar into a large zipper storage bag. This is a gallon bag but if you have something bigger I recommend it. This bag was a tad small and we had to do then next step in two parts.

In goes the cereal mixture (for us, just half).

Now give it a good shake. Really shake it up baby. 
(OK, sorry that was pretty cheesy but I couldn't resist)

Lastly spread it out on a rimmed cookie sheet and let it dry/set up. Then store in another (clean) zipper bag or other air tight container.

This would be great for a pool party or post soccer/baseball game treat. Here are the recipe links again:  Chex,  Betty Crocker