Wednesday, May 25, 2011

The Basics: Marshmallow Buttercream


I'm starting a new section on the blog called "The Basics". These recipes are basic components of larger recipes. An assortment of icings, buttercreams, glazes, fillings, cakes, cookies, etc. that you can use to make all sorts of finished desserts. They won't necessarily leave you with a finished product, although I've been know to consider a bowl of buttercream "dessert", but rather the solid foundation for a spectacular creation. Once you master a few basic recipes the combinations for noteworthy confections are endless. So go forth and create!

The first in this series is Marshmallow Buttercream. Normally I'm not a big fan of butter and powdered sugar based icings/buttercreams. They are boring, gritty, greasy and overly sweet. This recipe, however, is one of the few exceptions.  It is to die for! Very creamy, pretty sweet, surprisingly not sticky and delicious. It's a great alternative to a plain vanilla buttercream without overwhelming the other flavors in your dessert. Kind of "Plain Vanilla Plus". (This recipe and versions of it are all over the web. I can't remember where I got it so my apologies if I don't give credit.) I love it on chocolate cupcakes, it would be great on Hi Hat Cupcakes (Google it.) or as a filling for whoopie pies. Hmmmm, good idea for my next post. I'll work on it.  Sprinkle it with some graham cracker crumbs for a S'more cupcake (top left in photo). Divine!

Here's what you need: butter (I always use unsalted), powdered sugar, vanilla and a 7-8 oz. jar marshmallow cream.

Cream the butter until light and fluffy. Really beat it, you want to get some air in there.

Add the powdered sugar and beat again until fluffy. Scrape the sides down a few times to make sure you get it all mixed in. Then add the vanilla and mix well.

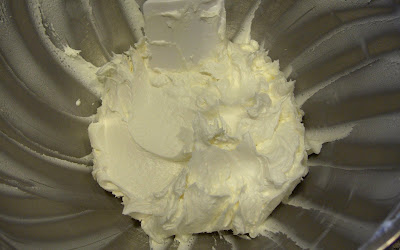
Lastly add the whole jar of marshmallow cream and beat until thoroughly combined, light and fluffy. Really give it a go!

There you have it. Marshmallow Buttercream. Just waintin' for a Chocolate Cupcake to ice or a Whoopie Pie to fill.


Marshmallow Buttercream
1-1/2 sticks (6oz.) unsalted butter at room temperature
1 C. powdered sugar
1/4 t. vanilla
7-8 oz. jar marshmallow cream

Cream butter until light and fluffy. Add sugar and beat until fluffy. Beat in vanilla until incorporated. Add marshmallow cream and beat until thoroughly combined and light and fluffy.

Makes approx. 2 cups
(enough to frost approx. 18 cupcakes or 30-40 mini cupcakes)

Thursday, May 19, 2011

Jam Bars


My apologies for the very very late post this week. We went away for a little adventure in San Francisco this past weekend and I'm spending the remainder of the week playing "catch up" around the house. Laundry, grocery shopping, end-of-school-year general chaos. Just the stuff that seems to consume my life some days. But it's so worth it. To get to escape a little to the big city and have a little fun. What fun we had!

We participated in the "Bay To Breakers" this past weekend. My husband, my 13 year old daughter, my 11 year old son and me. It was crazy! If you don't know what the Bay To Breakers is definitely google it! (Be warned you may get some pictures of people with nuttin' on.) It is the worlds oldest foot race; a 12K (thats 7.3 miles to us non-runner types.) run/walk; a moving party; a freak show. Besides being a race it's a crazy event where people wear costumes and some wear nothing but their birthday suits. Which, by the way, totally grossed-out my kids, as it should have. Its where many let their freak flag fly and oh my, some were mighty freaky! "You won't find a more wretched hive of scum and villany." (name that movie!) So why would an average, suburban, middle class family choose to participate? This year just so happened to be the 100th Anniversary of the race, and there has been talk of canceling it in the future, so I wanted to my kids to do it just once. To participate in something big. Something unlike our controlled suburban environment. To push outside the comfort zone and experience a little "real life". To see the world and humanity on a wider stage, for better or worse. And we saw a lot. Lots of "teaching moments" for our kids. And we did it. We finished. All 7.3 miles of it. Plus the 13 blocks we walked from our hotel to the starting line. Plus the 2 miles we walked back to the Polo Fields to get our t-shirt and finishers medal. Plus the other 15 blocks we walked to catch a ride back to the hotel. Whew! It was a lot of walking!

For a baker, cook and eater, that meant a lot of calories burned. Wahoo! A free pass to eat whatever I want. So of course the night before we went to Cheesecake Factory. And of course we ordered Fired Macaroni and Cheese. . .divine, and pasta. . .delicious and CHEESECAKE. . .out of this world. My son and I are working on a homemade version of the Macaroni and Cheese. Stay tuned. After the race we popped into the nearest smoothie joint. It's a big chain, I'm sure you know the one I'm talking about. I got my usual Peach Pleasure smoothie and then spied a jam bar in the pastry case. I had all those burnt calories to replace so why not. I got a jam bar and. . .meh, it was just OK. Kind of gummy, mushy and soft, like it had been sitting there quite a while. And oh how I love jam bars. It was nothing short of heartbreak. When I got home I couldn't shake the dissappointment of the jam bar. The jam bar had to be redeemed. I went to my trusty recipe binder, got out my trusty jam bar recipe and set to baking. Enjoy!

Here's what you need: flour, baking powder, salt, rolled oats (I like the quick cooking kind for this recipe.), brown sugar, butter, your favorite jam/jelly/preserves, chopped nuts (your choice, I usually use almonds but I didn't have any so I used pecans.).

In a large bowl mix together the flour, baking powder, salt, rolled oats and 
brown sugar.

Toss in the nuts. You can wait and just put the nuts on the top layer but I like them throughout. Your choice.

Cut the butter up into smaller pieces and then blend into the dry ingredients. You can use at pastry blender or do like I do and just use your hands (they're easier). These bars are pretty crumbly, I like them that way but if you prefer that the bar hold together a bit more, just add 2-3 more tablespoons of butter.

This is what it should look like once all the butter is blended in. It will be pretty dry but if you pick some up in your hand and squeeze it should hold together.

Take out roughly 2 cups of the crumb mixture and set aside. Pat the rest into a 13x9 inch pan. Pack it in pretty good and even. Press down HARD.

Next spread 2 cups of your favorite jam, jelly or preserves on top of the crust. I was using cherry preserves but didn't have 2 cups, so I used apricot jam to make up the difference. Turned out pretty tasty. Just use what ever flavor combination you like.

Crumble the reserved 2 cups of crumbs on top leaving some gaps. If you didn't add the nuts into the mixture before then just sprinkle them on top. Then into the oven; 350°F; for 25-30 minutes until the top starts to brown.

Cool completely and then cut into squares. Yummy Jam Bars.

Jam Bars
2 C. flour
1-1/2 t. baking powder
1/4 t. salt
2 C. quick cooking rolled oats
1 C. brown sugar
1 C. butter
2 C. jam, jelly or preserves
1/2 C. chopped nuts

Preheat oven to 350°F.
Combine flour, baking powder, salt, rolled oats, brown sugar and nuts*.
Cut in butter until crumbly.
Reserve 2 cups crumbs. Pat remainder of mixture into a 13x9 inch pan.
Spread jam over bottom crust and then top with remaining crumbs.
*Sprinkle with nuts if nuts were not added into crust.
Bake for 25-30 minutes until top starts to brown.
Cool completely before cutting into bars.
Makes approximately 24  2x2 inch bars.


Tuesday, May 10, 2011

Limeade Sparkler

I'm apologizing in advance for all the out-of-focus shots in this post. Not sure what was going on but I just couldn't get it in focus. Maybe it was the glass? The liquid? The lighting? My camera (it's old)? Not sure. I'll have to investigate.


Time to confess. I love Taco Bell's Limeade Sparkler. I find myself sneaking through the drive thru to get one when I'm out and about by myself. It's a bad habit. I know. I just can't help myself. The tangy lime, the sparkly bubbles, the cool clear glass with the two-tone drink. I've been lured in by the marketing, the presentation and the taste. They are just so dang refreshing on a hot day. If you live in my neck of the woods, hot is pretty darn hot: 105, 109, for a couple of weeks each summer. On a day that hot, you just can't drink soda. To thick, to syrupy, to sugary. . .even the diet. That's not to say that I've been cured of my Diet Coke addiction. I know, I know, it's really bad for me. I've tried to kick the habit a bunch of times. Gone as long as 6 months without, but somehow I'm always lured back. It really is my one vice. I don't smoke, I'm not a heavy drinker, I don't tan, we eat a balance healthy diet, etc., etc., etc.. Please forgive me. And please don't tell me how bad they are for me, I KNOW! 

I recently checked out the calorie content of the TB Limeade Sparkler and oh mama, 150 calories for the 16 ounce version. Whoa! I need to slow them down. Can't be chugging too many down without eventually packing on a pound or two. So, I decided to come up with a homemade version. The goal was lower calories, FOR SURE, and definitely bring the cost down, but still with all the flavor. What I've come up with is pretty good. I dare say I like it better than the TB version, but I'll let you be the judge. Enjoy!

It's pretty simple. Here is all you need: Torani Lime Syrup, Club Soda and a lime.

Fill a 12 oz. (1-1/2 cup) glass with ice. Don't pack it in, just fill it up. You could use a bigger glass but you'll have to adjust the syrup and lime.

Pour 1 ounce of lime syrup into the glass.

Cut the lime into quarters. You only need 1/2 a lime per drink so why not make two?

Squeeze the limes into the glass and go ahead and throw them in.

Now just fill the glass up with club soda. It's that easy. Doesn't it look cool with the two-toned drink. Of course you want to stir it up before you drink it, but I like to take a minute to marvel at the presentation. I'm weird like that.

Calories you ask? Not bad: 78. 70 for the ounce of lime syrup and 8 calories for 1/2 lime. Now I can live with that. I'm thinking and adult version might benefit from some rum or vodka but I'll experiment with that another time. 
Stay refreshed!
Becky

Wednesday, May 4, 2011

Cheesecake Bars

As of late I've had a hankerin' for some cheesecake. On more than one occasion I actually had a whole one in my shopping cart, then put it back, reminding myself that store bought cheesecakes just aren't that good. Why waste the indulgent calorie content on "store bought". Well eventually some urges just have to be satisfied so I decided to make a cheesecake. But. . . well. . . then I've have a whole cheesecake lying around the kitchen, calling to me, begging me to eat it. Not good, not good at all because if there is one thing I can't resist it's cheesecake. Well, actually there are lots of things that trump my self control but we won't go into that here. So off I went to my pile of "recipes to try", it's a big pile, embarrasingly big! I'm a recipe hoarder, it's a problem, I need help.  What I choose from the aforementioned recipe pile (in this case computer file) was Bakerella's recipe for Cheesecake Bars. That seemed a little more manageable. Bars are easy, plus I can cut them up and pass them off to unsuspecting friends. (insert evil laugh, bwa ha ha ha). 
I was pretty happy with how they turned out. They are sweet, really sweet, so be warned. I would give them about an "8", but my family, friends and co-workers LOVED them. I might change it up a bit, making a coffee flavored cheesecake layer, cutting down a bit on the chocolate but those modifications are for another day. I do my best to not fiddle and tweak the first time I make a recipe. So I pretty much made these just as the recipe was written.
Enjoy!

For the crust layer you need butter, brown sugar and Biscoff cookies. If you haven't tried these cookies yet then get yourself some IMMEDIATELY. They are so yummy. One of my favorite cookies.

The recipe calls for 1-1/2 cups of crumbs or approximately 27 cookies. I didn't measure. I threw in 27 cookies, then there were just 5 left in the package so I threw those in as well. So 1 package of Biscoff cookies is what you need.

Pulse the cookies into crumbs. Then add the brown sugar and pulse again until mixed.
Oh and yes, my food processor survived the Mandelhoernchen Melancholy. Wahoo! 


Add the butter and pulse again until well mixed.


Dump into an 9x13 pan.


Press evenly into the pan and set aside.

For the filling you need: cream cheese, sugar, flour, eggs, sour cream and vanilla.


Beat together the cream cheese, sugar and flour until light and fluffy.


Ohhh, light and fluffy and creamy.


Turn the mixer to medium low and add the eggs one at a time mixing well after each.


Add sour cream and vanilla and stir just until mixed.


Pour over the crust and bake in a 325°F oven for about 45 minutes.


Let cool completely. I trimmed off the edges so that it had an even surface. Well actually I peeled it off with my fingers and shoved it into my gob. But you know, same difference. The point is that I made the top layer even. 

When the cheesecake is almost cooled to room temperature, make the chocolate layer. You need semi-sweet chocolate chips, butter (not shown), heavy cream and powdered sugar.


Put the chocolate chips in a heatproof bowl.


Heat the butter and cream just to boiling. When you see tiny bubbles appear around the edges it's ready. Turn off the heat.


Pour the hot cream and butter over the chocolate chips.


Stir until totally combined. It will look weird and grainy at first but just keep stirring. . .


Soon you'll have a smooth even mixture.


Add the powdered sugar and mix well. WOW, that sugar looks really "blown out". I promise I'm working on my photog skills. Looking for a good class. Bear with me.


Pour the chocolate over the cheesecake and if necessary use a small spatula to spread it out evenly. Refrigerate several hours or overnight and then cut into square.

Delish! These are pretty good. I can't wait to try some different flavor possibilities.
Here is the link to the recipe again: Cheesecake Bars While you're there, be sure to poke around Bakerella's blog. It's great. She the queen of the current Cake Pop Craze. 
Enjoy!
Becky