Tuesday, August 23, 2011

Veggie Bread


This recipe is dedicated to Taylor and Andrew. Two of the biggest fans of this delicious breakfast treat. It started out as a way for me to get my kids to eat more vegetables. Way back when they were little. Back when we called it "Chocolate Chip Bread" so they would eat it. It has since come to be know as "Veggie Bread" and it is a family and friend favorite. It is in no way health food but as breakfast breads go, it's nutritionally better than most, without sacrificing taste.

It all began with a recipe for "Banana Pumpkin Bread" that I tore out of an old magazine my mom had. It seemed interesting enough but we all have a million recipes for banana bread, pumpkin bread, zucchini bread, etc. I wanted to take this up a notch. Make some changes so that I could feel better about feeding it to my kids. The first change I made was to cut down the sugar and oil and add an equal amount of applesauce to replace it. I then decided to add shredded carrots and zucchini, doubling the quantities for the batter to accommodate the extra bulk. Then, to get my kids to even try it, I added mini chocolate chips instead of nuts. Nuts would be great but at the time my kids wouldn't eat them and the chocolate made them think they were getting a treat. Seriously, when you have little kids, getting them to eat is all about "spin". What I ended up with was a delicious breakfast bread, full of veggies, lower in sugar and fat but moist and full of flavor. Give it a try. I hope you'll agree.

Here's what you need: vegetable oil, applesauce (these little snack cups work great), sugar, eggs, AP flour, baking soda, salt, cinnamon, ripe banana, canned pumpkin, carrot (I ended up needing two this size.), zucchini (this one was just the right size), mini chocolate chips (You really need the mini ones for this. The regular size chocolate chips tend to sink to the bottom when it bakes and are too chunky. Or use nuts if you want to be a party pooper, or nothing. They're optional.) Can you see the banana? It's that black thing in the lower right corner. Don't be alarmed. When bananas start to turn and aren't good for just eating anymore I toss them into the freezer. It turns the skin black but saves the banana for baking with later.


This is what it looks like when you snip one end and squeeze it out. I know, creepy. Really creepy. Like a demented albino banana slug. GROSS! But here is the cool thing. By tossing it in the freezer you avoided throwing it away and you don't really have to mash up the banana because the freezing/thawing process did that for you. Win, win!


To start, shred up the carrot and zucchini. Use the fine holes on your grater and before measuring squeeze out as much moisture as you can. To do this take about 1/3 of the shredded veggie and squeeze it in your hands kind of like you are going to make a snowball, a really densely packed one. Do this over the sink or a large bowl. A lot of juice will run out between your fingers and that's a good thing! This step will keep your bread from being soggy. Don't skip it!


Now stir together the sugar, oil and applesauce.


Add the eggs and mix it up good.


Measure your flour, baking soda and cinnamon into a large mixing bowl and give it a good stir.


Add two big creepy albino banana slugs, I mean add the mashed banana and 1/2 the liquid mixture and stir it up well.


Add the pumpkin and remaining liquid and stir well. Use the back of the spoon to make sure you've broken up all the pumpkin and banana chunks and you have a smooth batter.


Next, toss in the carrot, zucchini and mini chocolate chips.


Mix it up good.


Divide it into two standard sized loaf pans that have been sprayed with Pam.


Bake for 55-65 minutes until a toothpick inserted in the center comes out clean. Let them cool at least 10 minutes before tipping out of the pan and finish cooling on a wire rack. I usually slice one up for breakfast and stick the other in the freezer for later.


Now grab a cup of your favorite coffee and enjoy. Think of all that veggie goodness and feel good about breakfast. Seriously, this isn't health food but really, not so bad. Here is how it breaks down. For 1/12 of a loaf: 230 calories, 6g. fat, 2g. fiber, 4g. protein, 45% Vitamin A, 2% Calcium, 5% Vitamin C and 9% Iron.

Veggie Bread
Preheat oven to 350°F
Yield: 2 loaves

1/3 C. vegetable oil
1/3 C. applesauce
2 C. sugar
4 eggs
4 C. all purpose flour
2 t. baking soda
1 t. salt
1 t. cinnamon
1 C. mashed ripe banana
1 C. pumpkin
1 C. grated carrot
1 C. grated zucchini
1 C. mini chocolate chips or chopped nuts (optional)

In a mixing bowl, combine oil, applesauce and sugar. Add eggs; mix well.
Combine flour, baking soda, salt and cinnamon; gradually add to the creamed mixture alternately with bananas and pumpkin. Stir in carrots, zucchini and chocolate chips (nuts). Divide evenly between to greased (or foil lined) 9x5x3 inch loaf pans. Bake at 350°F for 55-65 minutes or until a toothpick inserted near the center comes out clean. Cool at least 10 minutes before removing from pan to a wire rack to cool completely.

Friday, August 19, 2011

Restaurant Supply Adventure

I wanted to take a break from cooking this week to tell you about one of my favorite stores. No, not Nordstrom, but yes it is a favorite, not Target although I'm there 2 or 3 times a week. It's the Restaurant Supply and it's a great place for an adventure. If you live anywhere near a major metropolitan area you should be able to find one good restaurant supply store. They are usually in a warehousey type location and sometimes not in the greatest of areas (go during the day and take a friend.) but they are oh so much fun. Here in the Sacramento area I go to Cresco. They have everything including the kitchen sink. Literally, they sell kitchen sinks. You'll find any and every kitchen tool, pot, pan, and appliance that you can think of, in every variety imaginable. If they don't have it and they can't order it then it doesn't exist. The selection, quality and prices beats out the gourmet kitchen stores at the mall, the discount store and the bath and home store. Please go check it out:

They have a wide selection of graters.


If you need a strainer they've got plenty to choose from.


Even one as big as your head. WOW!


Perhaps you're looking for an ice cream or cookie scooper.
It takes all my will power not to buy one of each. I think it's the colors that suck me in.


How about a whisk.


This one is as tall as my 11 year old son.


Here's a pot for cannibals to envy. Seriously, how much chili do you need to make?


And who knew there were this many different thermometers?


Here's the best part of the Restaurant Supply Store: the prices. I bought one of these sets of measuring spoons for $10.99 at the high-end gourmet shop at the mall and the other for $2.19 at the restaurant supply. Can you tell which one is which? Really? Truth be told I like the $2.19 one better.
(Scroll down and I'll give you the answer.)

Here are a few of the things I got on my last trip (clockwise from top left.):
A 1/4 sheet pan, you really can't have too many of these and for $4.99 each, why not stock up.
A cover for a 1/4 sheet pan, this is going to come in handy.
A steamer rack. It's meant to go in the bottom of a big pot to steam stuff but I liked the size and the fold up feet on the bottom and am planning to use it to glaze cakes.
A cake ring. Because I've always wanted one, I know, I'm weird. I do plan to make the "Helga Cake" from Gesine's book. (click here for more info) and I'll need a cake ring.
A bowl scraper, because it was $.75.
Some spreaders, because they looked handy and again, under a buck, so why not?
This little cutting board because I had a wood one similar in size that I used all the time and it broke.

I also got a 10-inch cast iron skillet for under $8.00. I kid you not, UNDER $8.
All and all I only spent about $60.00 and came home with some great quality kitchen equipment and all sorts of ideas on how to use them. Oh man. . .I can't wait to get started.

So next time you're in the market to upgrade your kitchen equipment, skip the mall, skip the home & bath store and head over to your local restaurant supply. It's an adventure that won't empty your wallet.

Oh and the spoons on the left were $2.19 at Cresco, on the right $10.99 at Crate and Barrel.

Sunday, August 14, 2011

Espresso Nanaimo Bars


If you haven't tried a Nanaimo Bar then you just haven't lived. I'm serious, they are life changingly delicious. They hail from Canada (Google it for the full story.) and are a perfect combination of flavors and textures all layered together. But what are they? A little to soft and creamy to be a cookie. A little too cookie-like to be a candy. We'll just call them dessert although you do eat them with your hands so maybe we're back to cookie. No, that's not quite it. Maybe we'll just agree that they lie on a culinary plane all their own; they are Nanaimo Bars, and that's that. 


Try these next time you are charged with supplying dessert to an occasion and you'll receive proposals of marriage, offers of first born children and more. They are really simple to make, no complicated ingredients, techniques or equipment and they freeze beautifully. Once you've mastered the basic recipe the possibility of flavor combinations is limitless. You can make them vanilla, or Espresso flavored (like I'm showing you here), make cherry filling for a "Black Forest" version, or add peanut butter if that's your preference. Whatever you do, try this recipe!


Here's what you need for the first layer: butter, sugar, cocoa, an egg, graham cracker crumbs, coconut (I like the natural unsweetened kind. It's usually a bit finer so the bars cut easier and doesn't have a bunch of yucky preservatives in it.), and finely chopped almonds (pecans and walnuts will also do the trick.).

Start by beating the egg. Make sure the bowl is big enough that you can add some hot liquid later to temper them.

Put the butter, sugar and cocoa powder into a large saucepan over medium-low heat. Stir until the butter is melted and it is all mixed together.

Add a bit of hot liquid to the beaten egg to temper it. I don't have a picture because tempering an egg is, well, temperamental. I didn't want to risk scrambled eggs. Once the egg is tempered stir it all back in to the sugar/butter/cocoa mixture and continue cooking over low heat until the mixture thickens. It will have an odd, lumpy texture and the butter may not be fully incorporated. That's OK, it means the egg has "curdled" a bit but it really doesn't affect the outcome. If you're fussy about this kind of thing, alternately, you can slowly drizzle the sugar/butter/cocoa mixture into a larger bowl containing the beaten egg, whisking constantly until it's all incorporated, then transfer back to the saucepan and heat until thickened. Whatever floats your boat.

Once it starts to thicken, remove from heat and stir in the graham cracker crumbs, coconut and almonds. Get it really well mixed!

Dump the mixture into an ungreased 8" x 8" pan. Spread it evenly and press down firmly.

I mean, really press it down, you want a good sturdy crust layer. Pack it in. Then stick it in the fridge until your next layer is ready. As far as things go, you could stop right here and you'd have a lovely bar cookie. Don't be tempted. Let's keep going and take it to the next level.

Here is what you need for the second layer: more butter, milk (or cream, the original recipe called for cream but I didn't have any, milk works just fine but if you want it to be really rich, use cream.), pudding mix (I like the cheesecake flavor but you could use vanilla.), powdered sugar, instant coffee and Kahúa (If you don't want the booze, use vanilla extract, water or coffee.).

Stir the instant coffee and Kahlúa together until it's a thin paste. This is the same concoction that I used to flavor the coffee buttercream from the Oreo Cake post. It's the bomb! Use it anytime you want something with good coffee flavor.

Put all the ingredients in a large mixing bowl along with the coffee mixture. 

Use a hand mixer to whip it all up until it's smooth and creamy. Yum, resist the urge to grab a spoon and scarf this up.

Spread the mixture evenly over the crust and pop it in the freezer for at least 10 minutes.

For the last and final layer you'll need butter and semi-sweet chocolate.

Melt them together until nice and smooth. I do this in the microwave, 30 seconds at a time on high until it's pretty smooth or do this on the stove top over a low heat.
(Yuck, that's a blurry picture!)

Let it cool down a bit (you don't want it to melt the other layer.) but it should still be spreadable.

Working quickly spread it evenly over the top of the filling and then put it back in the freezer. To cut nice even pieces first score the chocolate layer on top then use a thin knife dipped in hot water and wiped dry to cut all the way through. I like to keep it frozen in one piece until I'm ready to serve it. Then cut, plate and store in the fridge until dessert time. 

These are very rich so I like to cut 1"x1" pieces and serve them like bon bons or rustic petit fours. But, just a warning, ya can't eat just one. They are too good. Enjoy!


Espresso Nanaimo Bars
Makes about 64 1-inch squares

Crust:
1/2 C. unsalted butter
1/4 C. sugar
5 T. cocoa
1 egg, beaten
1-3/4 C. graham cracker crumbs
1 C. coconut
1/2 C. finely chopped almonds (walnuts or pecans can be substituted)

Filling:
2 T. instant coffee
1 t. Kahlúa, coffee or vanilla extract
1/2 C. unsalted butter
2 T. plus 2 t. milk or cream
2 T. instant pudding mix (vanilla or cheesecake flavor)
2 C. powdered sugar

Topping:
4 oz. semisweet chocolate
2 T. unsalted butter

Crust: In a large saucepan melt butter, sugar and cocoa. Temper the beaten egg with a bit of the mixture and return to the saucepan whisking constantly until it starts to thicken. Remove from heat and stir in graham cracker crumbs, coconut and nuts. Stir together well and firmly press into the bottom of an ungreased 8"x8" pan. Refrigerate until firm.

Filling:
In a large mixing bowl dissolve the instant coffee in the Kahlúa. Add remaining ingredients and Beat together until light and fluffy. Spread evenly over crust, cover and freeze until set.

Topping:
Melt butter and chocolate over low heat, or microwave 30 seconds at a time, stirring until smooth. Cool. When cooled but still spreadable, pour over filling and spread evenly over the top. Work quickly so that the filling layer does not melt. Keep refrigerated or frozen until ready to cut and serve.

Score chocolate layer then use a hot knife to cut into 1-inch square.

Filling Variations:
Mint - substitute 1 t. peppermint extract for the coffee/Kahlúa and add a few drops green food color.
Peanut Butter - Reduce butter to 2 T. and add 1/2 C. smooth peanut butter, use vanilla pudding.
Black Forest - substitute 1 T. cherry juice for the coffee/Kahlúa, add a few drops red food color and 1/4 finely chopped, drained Maraschino cherries.
Orange - substitute 1 T. Grand Marnier for the coffee/Kahlúa and add 1 T. grated orange zest.
Coconut - substitute Coconut Instant Pudding for the vanilla/cheesecake flavor. Add 1/4 grated coconut.

Friday, August 5, 2011

The Basics: Pie Crust Perfected

Over the years I've struggled with making a decent pie crust or pastry. I've found a few recipes that have gotten me by and I've tried many more. Ones that use butter exclusively. Ones that call for only shortening. Ones calling for various combinations of both. Some claim adding vinegar makes for a tender crust. Some suggest buttermilk. Others say using a food processor is the best technique. Then some say don't. Cornmeal and cheddar cheese have cropped up in a few, along with a myriad of ingredients. It's all so confusing. Where to begin?

How do I sift (nice pun eh?) though all the recipes and find the perfect one. I guess I should start by deciding what I want in a pie crust. My preference is a crust with light, buttery, flakey layers. Kind of a modified puff pastry. A bit sturdier though, to stand up to the heft of the filling. So once again I found myself poking around on Gesine's blog: Confections of a (Closet) Master Baker. There I found her recipe for Quick Puff. It was such a simple recipe, could it deliver? I gave it a try and EUREKA! It was perfect. I learned the secret to buttery, flakey, light pie crust: simple ingredients and technique. Give it a try. It doesn't call for sugar so it will work great with either sweet or savory pies. I cut the recipe in half and it was plenty for a full double crust 9-inch pie. But, as long as your taking the time, why not make the full recipe, divide the dough and freeze for later. Save some steps down the road.

Don't forget to go poke around Gesine's blog and check out her books. She got a great wry humor and a refreshing perspective on cooking. 

Let's get started. . .

Here's all you need: flour, butter (I always use unsalted.), salt and water. Simple!

Use a scale to weigh out your flour. For serious baking weight usually trumps volume.
This digital version by Salter has served me well over the years.

Cut the butter in 1-inch-ish chunks and toss them in a big bowl with the flour.

Use your hands to mush it about breaking the butter down into smaller chunks. You're not looking to get all the flour completely incorporated and you certainly don't want the texture of "course meal" like many pie crust recipes want. Just get the butter broken down a bit. You want some chunks. Trust me.

Like this is just fine. Chunks of butter, coated with flour and
some extra flour in the bowl.

Add the water and toss it around until it just starts to clump together.
It's going to be lumpy.

On a VERY VERY GENEROUSLY floured surface, form the dough into a rough square. Now walk away and let it rest. A good 10 minutes or more.

Once it's rested, generously flour the top and roll into a rectangle. It may fall apart a bit, don't worry. Just stick the loose chunks back on and keep going.

Use a pastry scraper to flip 1/3 of the dough on top of itself.

Now flip up the other side on top. Like you're folding a letter. Again, bits and chunks may fall off, just stick them back on.

Turn the whole mess 90 degrees and give it a liberal sprinkling of flour. Roll it out again to a rectangle. 

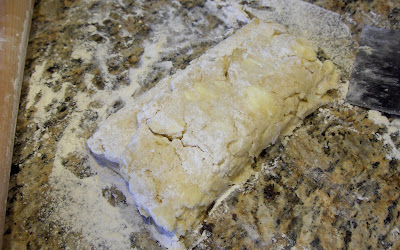
Repeat the folding 3 more times keeping everything generously dusted with flour. Your finished dough should look like this. It will have come together more smoothly and resemble pie dough.

Let it rest a bit and then roll out as you would for any pie or recipe that uses pie dough. Or divide it up, wrap tightly and put in the freezer until your ready to make pie.

Here again is the link to the recipe. Remember as shown above I made 1/2 the recipe. Practice up, pie season will be here before you know it.