Monday, January 30, 2012

PW's Dr. Pepper Pulled Pork


Seriously, I've got you covered for Super Bowl Weekend:  Pulled Pork Sandos! They're major! In a major way! Spicy, sweet, pork, slow cooked into tender oblivion. "You had me at pork." OK, all joking aside, this is some serious pulled pork. 

If you've been reading this blog, you know that I follow a number of cooking blogs: Confections of a Closet Master Baker, Smitten Kitchen, Joy The Baker, In Jennie's Kitchen (This one is breaking my heart right now.) and last but certainly not least, Pioneer Woman. They are all a bit different but all written by unique, talented women. They inspire me to keep blogging, baking and creating. I've tried many of their respective recipes and even chronicled a few of them here. So this week I'm bringing you a recipe from Pioneer Woman*. Thanks PW!

Over the years I've tried several times to make pulled pork. Every time, it's been just kind of OK. Not horrible but not great. When Ree posted a recipe for Spicy Dr. Pepper Shredded Pork, I knew I had to try it. After all, my mother was from Texas, where Dr. Pepper flows like water. It was an instant hit with family and friends. Super easy to make and just a few simple inexpensive ingredients. Since she posted this recipe back in March 2011, I've made it at least 5 times and it turns out awesome every time. It's a crowd pleaser for sure. So if you have a crowd to feed for Super Bowl Sunday, I've got you covered.


Just a few ingredients: boneless pork shoulder roast, Dr. Pepper, Chipotle Peppers in Adobo Sauce (the recipe calls for an 11 oz. can but that's a bit spicy for me so I use one of these little 7 oz. cans. Use your judgement.), an onion, brown sugar, salt and pepper.

Note: The recipe calls for 2 12 oz. cans of Dr. Pepper. We don't drink Dr. Pepper so I really didn't want to buy a whole 12 pack. I might have sprung for a 6 pack but I don't think they even sell them any more. Singles are over a buck-fifty a piece, but, the 2 liter size was only 89¢. So in the interest of economy, I went with the 2 liter size. Just remember that you need 24 oz. total, which is 3 cups.


Start by cutting the onion into thick slices (1/2 inch plus) and cutting those in half. Lay them in the bottom of a large ovenproof Dutch Oven with a lid. Salt and pepper the pork roast all over.


Lay the pork roast on top of the onion and pour in the peppers with all the Adobo sauce, the Dr. Pepper and brown sugar. Put the lid on the pot and roast in a 300°F oven for 6 hours. Turn the roast once or twice during the cooking time. 


After 6 hours, test to see if the pork is done. It should fall apart very easily. If it doesn't put it back in the oven for 30 minutes and check it again. When it easily pulls apart with a fork it's done.


Remove all the pork from the pot. It will probably fall apart into several pieces.
That's a good sign!


Set a strainer over a bowl and pour off all the liquid from the pot, straining out the peppers and onions. I throw them out as no one in my family likes big hunks of onions or peppers. If you do, by all means, leave them in there.


What you're left with are all the cooking juices from the pot. Put this in the refrigerator for several hours or overnight. You want the fat to rise to the top and solidify.


Use two forks to shred the pork and return it to the cooking pot. Set this in the fridge, covered, until you are ready to serve.
I usually take it to this step the night before.


When you're ready to serve. Remove the cooking liquid from the fridge. Skim off the layer of fat on the top (that orange stuff) and toss it out. The remaining juices may have "gelled up". If so, microwave them a few minutes to get them liquid. Pour it into the pot with the shredded meat and heat the whole thing over low heat until heated through. Now ENJOY!

There are any number of ways you can serve this. I like it in tortillas with a bit of cheese and the usual taco fixins. My kids like BBQ pork sliders: slider buns, barbeque sauce and pork. How about nachos? You could also scramble it up with some eggs and top with cheese and salsa for a hearty breakfast. Sky's the limit here.

Here's the link to Pioneer Woman's recipe: Spicy Dr. Pepper Shredded Pork. Try it out, I guarantee you'll LOVE IT.

*If you are a fan of Pioneer Woman you probably know that she has a show on Food Network. I made this recipe two weeks ago and coincidently she demonstrated it the following Saturday on her show. Look for it on Food Network Channel, the Food Network web site or on iTunes.

P.S. I don't know Ree. She probably has no idea my blog exists, I'm just a major fan!

Monday, January 23, 2012

King Cake (part deux)


I know I already posted King Cake, not quite a year ago, but my good friend Sue has just relocated from New Orleans and inspired me to revisit the King Cake with some changes. I also wanted to post a more timely recipe. Now is when you would traditionally serve this Mardi Gras treat. I'm no expert here, but according to Sue, in NOLA, they serve this on Fridays beginning on January 6th until Mardi Gras on February 21st. If you search "King Cake" on the internet there are thousands of versions, so who knows what is "authentic" or "traditional". It think it all depends on what you've grown up with or what they make at your neighborhood bakery. One thing they all do have in common is the three color decoration (Gold = Power, Green = Faith, Purple = Justice.). That's what really makes it a "King Cake". Beyond that, it's a sweet, breakfasty bread/cake, filled with any combination of flavors.

This time, again, I started with Gesine's King Cake recipe found here. I replaced the maple syrup with honey because I wanted a more neutral sweet flavor to the dough. I reduced, and slightly tweaked, the quantities (by about 25%) for a slightly smaller cake. (If you remember last time the finished cake was HUGE!). And lastly, I swapped out the bourbon/cinnamon pastry cream with lemon filling. Really, Gesine's pastry cream filling was absolutely delicious, I just wanted to try something different as well as reduce the steps and ingredients. I was pretty pleased with the results. I'd just do a few things different. The lemon pie filling worked well, but I like a really tangy lemon flavor, so I'd probably use a good quality lemon curd or make my own. I also think I slightly over baked my cake. It should be a more golden brown, mine is a bit dark. I will definitely make this again and my head is swimming with different filling ideas, cream cheese among them. I'll warn you his recipe is pretty step intensive and takes the better part of a day to finish, but it's a great opportunity to learn how to work with yeasted doughs. Laissez les bon temps roulez!
Here is what you need for the cake: bread flour (King Arthur is the best!), instant yeast (I always use SAF.), salt, honey, eggs (only 2, not 3.), whole milk, a lemon for the zest, vanilla paste or extract (Try to find the paste!), butter and lemon filling (Next time I'll probably use lemon curd because I like a pretty tangy lemon filling, but the filling works too.) You need a few more things for decorating and icing but we'll get to that later.

Start by stirring together the flour, salt and yeast. Use your mixer with the dough hook.

In a separate bowl whisk together the honey, eggs, milk, lemon zest and vanilla paste. I usually start by adding the eggs to the honey and getting them well mixed then slowly whisking in the milk and adding the lemon zest and vanilla last. If you dump it all together and then try to mix it you end up with a globby lump of honey on the bottom.

Add the wet ingredients to the dry and stir just to combine. Then, with the mixer going, slowly add bits of the softened butter.

Speed the mixer up and let it go until the dough pulls from the side of the bowl and is shiny and elastic. This can take up to 10 minutes. If the dough is very sticky add a bit more flour.

Proof in a well oiled, straight sided container until double in size. This will take at least an hour if not more. It took over 3 hours for me because it was a cold day. Be patient and don't try to rush it!

Once proofed and doubled in size, punch down dough and turn it out on a well floured surface.

Roll it out, flouring as needed, to a 13 x 20 inch rectangle.

Spread evenly with the filling, leaving an inch margin along the side closest to you.

Starting at the far side, roll up into a tight roll.

Pinch the edge to seal.

Generously butter (or line with a silpat mat) a rimmed baking sheet. Generously butter an oven-proof custard cup and form the dough into a ring around it with the seam side of the roll on the bottom. Pinch the ends together to seal. Make six evenly spaced slashes in the dough going through at least the first layer of dough.

Cover loosely and proof again until doubled in size.

For decorating you'll need one egg white beaten until loose and frothy and coarse colored sugar in gold/yellow, purple and green. Optionally you can use clear sugar.

Brush the ring with the egg white and sprinkle with alternating colors of sugar. Leave the custard cup in place for baking.

Bake in a preheated 350°F oven for about 30 minutes, just until light golden brown. I let this go a bit too long, it's just a tad dark. Using an oven mitt, remove the custard cup from the middle and let the cake cool on the pan.

To ice the cake whisk together 1 cup of powdered sugar and 1 to 2 tablespoons milk. It should be just runny enough to drizzle off a fork but not more. If you used clear sugar then divide the icing into 3 cups and color them yellow, green and purple.

Drizzle the icing over the cake using a fork. If you used clear sugar and colored icing, alternate the colors on the different sections of the cake.

Slice it up and enjoy. You could  pretty much fill this with any flavor you like. Apple, cherry, almond, cream cheese. The possibilities are endless. Give it a try!

King Cake
by Becky Elkins, adapted from Gesine Bullock-Prado

Dough:
3-3/4 C. bread flour (plus extra as needed)
1 T. instant yeast
1-1/2 t. salt
1/4 C. honey
2 eggs
1-1/4 C. whole milk
zest of 1 small lemon
2-1/2 t. vanilla bean paste
3 t. unsalted butter at room temperature

Filling:
12-14 oz. lemon pie filling or lemon curd

Decoration:
1 beaten egg white
Coarse Sugar (preferably colored yellow/gold, green and purple)

Icing:
1 C. powdered sugar
1-2 T. milk
(optional food color in yellow, green and purple)

For the dough:
Place flour, yeast and salt into the bowl of an electric mixer fitted with the dough hook attachment.  Stir the dry ingredients together.  Whisk together the honey, eggs, milk, lemon zest and vanilla bean paste.
With the mixer on low, add the wet ingredients.  When the wet ingredients are just combined, slowly add bits of the butter.  Mix the dough until it starts to pull from the sides of the bowl and is very shiny.  If the dough is very sticky, slowly add extra flour.  The mixing process can take quite a while, up to 10 minutes. Proof the dough in a straight sided container, sprayed with non-stick spray, until the dough doubles in size. (about 1 to 1-1/2 hours)

Assembly:
Generously butter a rimmed sheet pan or line with a silpat mat. Punch dough down and roll out, on a generously floured surface, into a 13x20 inch rectangle. (dough should be just under 1/4 inch thick.) Spread filling evenly over dough, leaving a 1/2-inch margin on the long side, closest to you. Roll up, in a tight roll, starting with the long side farthest from you and rolling towards you, brushing off excess flour as you go. Pinch the seam to seal. Form roll into a ring on rimmed sheet pan. To help ring hold shape, place a generously buttered ovenproof custard cup in the center of the dough ring. Make 6 evenly spaced slashes around the ring. Cover loosely and let rise again until doubled in size. (about 1 hour) Preheat oven to 350°F. Brush lightly with one beaten egg white and sprinkle with alternating colors of sugar.  Bake for 30 minutes until golden brown. Let cool.

For the icing:
Whisk together the sugar and milk until smooth. Use a fork to drizzle icing over cake.

Alternate decoration: If you don't have colored sugar, brush ring with egg white and sprinkle with coarse sugar. After baking, separate icing into three bowls coloring one yellow, one green and one purple. Then drizzle icing in alternating sections of the cake. (Green, yellow, purple, green, yellow. . .)

Monday, January 16, 2012

No BBQ Tri Tip Roast


I never thought I'd say it but "I'm never going to barbecue a tri tip again!" There, I said it and although I also say "Never say never." this time it just may be true. Why? Because I've discovered the most delicious way to make tri tip right in my very own oven, in my nice warm and dry house. Don't get me wrong, I love to BBQ or really I should say "grill" but I'm a west-coaster and we say BBQ when we really mean grill. It's a regional thing, get over it. I love hangin' in the back yard, firing up the "Q" and grabbin' a cold one on a hot summer day. What I don't love is schlepping down to the gas station to fill the propane tank, then freezing my keester off in the back yard in the dead of winter. Although we've yet to have much rain here, once that sun goes down, it gets cold and gets cold quick and I don't much feel like bundling up just to go cook dinner. A bit of a hassle, or maybe I'm lazy, whatever, point is, it's easier in the oven.

What you need is a good marinade. Use a bottled one, your favorite recipe or the one I've included here, which came from my good friend Trish, which I pretty much use to marinate everything. You're also going to need a cast iron skillet. At least 10 inches, 12 inches would be better. If you don't have a cast iron skillet then stop reading this blog and get one IMMEDIATELY. They really aren't too expensive and will last you a lifetime. Seriously, get one! Then get to making this delicious No BBQ Tri Tip Roast.

Start with the marinade. Just five simple pantry ingredients: soy sauce, vegetable oil, wine (cooking sherry, marsala, any wine will do.), garlic (Fresh minced is best but you can use garlic powder in a pinch. . .I was in a pinch.), ground ginger. You're also gunna need a tri tip roast.


Whisk together all the marinade ingredients.


Put the roast in a large zipper bag and set it in a bowl.


Pour in the marinade, squish out all the air and zip it up. Let it set in the refrigerator for a couple of hours, up to overnight, turning it over several times.


Set your oven to 400°F. Get a cast iron skillet, at least a 10-inch one, and heat up a couple of tablespoons of olive oil. Get it good and hot.


Remove the tri tip from the marinate and scrape/shake off the excess marinade.
Carefully lay it in the hot pan and sear about 3-4 minutes.


Then flip it over and sear the other side, 3-4 minutes again. You want a nice crusty caramelization on both sides. YUM! Once both sides are well seared, put the whole thing (skillet and roast) into the preheated 400°F oven for 25-35 minutes. For medium rare at the thickest part, cook until a thermometer reads about 130°F.  Remove from oven and cover loosely with foil. Let rest 10-15 minutes.


Remove to a cutting board and slice it up. Yummy, yum, yum. Perfect, warm, and pink. Add some barbecue sauce and buns for tri tip sandwiches or slice into strips for quick fajitas. A great way to fix tri tip without the barbeque.


No BBQ Tri Tip Roast


2-1/2 to 3 lb. Tri Tip Roast


Marinade:
1/2 C. soy sauce
2 cloves garlic, minced (or 1/2 t. garlic powder)
1/4 C. wine
1/4 C. vegetable oil
2 T. powdered ginger


3 T. olive oil


Place roast in a large zipper bag. Whisk together marinade ingredients and pour over roast. Squeeze out all air from bag and seal. Place in a large bowl and refrigerate for several hours (or overnight), turning over frequently.


Preheat oven to 400°F. Heat 3 tablespoons olive oil in a large cast iron skillet (10 inches or larger.) over medium high heat.  Remove roast from marinade and shake/scrape off excess marinade from surface of roast. Sear roast in hot skillet 3 to 4 minutes per side. Place skillet with roast on the center rack of the oven and roast for 25-35 minutes (medium rare), until thermometer reads 130°F in thickest part of meat. Roast longer for medium or well done meat. Remove from oven, cover loosely with foil and let set for 10-15 minutes before slicing.

Tuesday, January 10, 2012

Grandma's Apricot Bread


For my first recipe post of the new year I wanted to get back to basics. (Yeah, I know, I posted already, but that was a cliché "Best of" post, not a recipe, so it doesn't count.) Something simple, not the fancy schmancy fare so abundant during the holidays, but a down home, easy to make, satisfying recipe. So I decided to make my Grandmother's Apricot Bread recipe. Well, I also had a big bag of dried apricots that I was going to use for our Thanksgiving stuffing. (Yes, I do weird things like add dried fruit to stuffing.) But we had a sort of "Un-Thanksgiving" and I didn't make stuffing and was left with a big bag of dried apricots. Any who, point is, I decided to make Apricot Bread.

This is one of the few recipes I have from my paternal Grandmother. As a child I didn't spend much time with her and what time we did spend wasn't in the kitchen. She wasn't particularly know to be a good cook. Not to say she was a bad cook, more of a practical, nuts and bolts, type of cook. I assume, fairly typical for a housewife in rural South Dakota in the 30's and 40's. Making do, so to speak, with the ingredients available, war rations and such. So, by modern culinary standards, there may be many things "wrong" with this bread. It's kind of heavy, a bit overly moist, maybe a tad bland. But growing up my Dad loved it. The recipe was handed off to my mom, who didn't particularly like to cook, but made this for my Dad, because he loved it. And so, I grew up with it and now, flaws and all, I love it. I've never tried to change or improve it because to me, it tastes like my childhood, like my mother's cooking, like my grandmother's cooking. Kind of baking nostalgia. In an ever changing world, made so small by technology, somethings should be left as they are. So if you're in the mood for an "old school midwest housewife's recipe", try this apricot bread.

Here's whatcha need to get started: dried apricots, sugar, softened butter, an egg, orange juice, flour, baking powder, baking soda and salt. You could also add some chopped nuts, about 1/2 cup, if you like. My dad doesn't like nuts in his baked goods so I've never had or made this with nuts. But if you're nutty, go for it.

These are the apricots. U-G-L-Y! For sure. That's because they are unsulfured. No sulfur dioxide added to keep them plump, soft and goldeny orange. Probably not what you are used to but, they are great for baking! Not so great for eating out of the bag. Kind of leathery and tough. But cooked in a recipe they are far superior in taste and texture to the gooey orange blogs we're used to. Plus, none of that yucky sulfur dioxide. (I discovered these because my sister is very allergic to sulfur dioxide.  I now try to avoid it in any dried fruit.) If you can't find the unsulfured apricots, by all means use the regular kind, my mom did for years, but if you can find them please take a leap and try them out.

Before you measure the apricots you need to chop them up. I started with a knife but these are pretty sticky and tough so I ended up using my kitchen shears to snip them up. Works just fine.

Once they are all chopped/snipped up, measure out 1 cup and then put them in a bowl with enough warm tap water to cover. Then let them sit for at least 30 minutes. 

After a minimum of 30 minutes, drain the apricots, reserving 1/4 cup of the liquid. Press down on the apricots to get most of the water out, you don't want them to be mushy. They're looking a bit more edible now, soft and plump. Preheat the oven to 350°F and grease a standard sized loaf pan.

Next beat together the sugar, butter and egg. Get it nice and smooth.

Stir in the orange juice and reserved 1/4 cup of soaking liquid.

Sift the flour before you measure it, then sift it again with the baking powder, baking soda and salt.


Add the flour mixture to the liquid with the mixer on low and mix just until all the dry ingredients are moistened. If the batter is a bit lumpy turn the mixer to medium for just 20-30 seconds. You don't really want to beat the batter, just get the larger lumps out.

Gently fold in the apricots until they are evenly distributed. If you're using nuts you'd add them here as well.

Spread the batter in a greased loaf pan. I had some of these foil pans leftover from my holiday baking and they work great, but any standard loaf pan will do. Bake at 350°F for 55-65 minutes until a toothpick inserted in the center comes out clean.

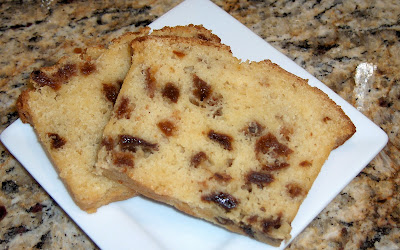
Ooohh, nice and golden brown. Let it set and cool a good 20 minutes before slicing.

This is great just as it is or you can toast it up and add a bit of butter. And now those ugly old apricots don't look so ugly any more. Enjoy!

Grandma's Apricot Bread
1 C. chopped, dried apricots
1 C. sugar
2 T. butter, softened
1 egg
1/2 C. chopped nuts (optional)
1/2 C. orange juice
2 C. sifted flour
1 t. baking powder
1/4 t. baking soda
3/4 t. salt

Soak apricots, in enough warm tap water to cover, for 30 minutes. Drain and reserve 1/4 cup of the liquid.
Preheat oven to 350°F. Grease a standard sized loaf pan.
Beat together sugar, butter and egg. Stir in orange juice and reserved soaking liquid.
Sift together flour, baking powder, baking soda and salt. Add to liquid ingredients and stir just until mixed and there are no large lumps. Fold in apricots and nuts (optional).
Spread batter into a greased loaf pan and bake for 55-65 minutes. Bread is done when a toothpick inserted into the center comes out clean. Let cool 20 minutes before slicing and serving.