Showing posts with label Icings. Show all posts

Friday, September 12, 2014

White Texas Sheet Cake


Seems like "Texas Sheet Cakes" are all the rage on the internet these days. Almost every cooking blog has one and they're all over Pinterest. There are about a million versions, I'm not kidding, a million. There's chocolate, white, pumpkin, peanut butter, red velvet, lemon, and even a "turtle" version. Seriously, if you can think up a flavor combination, there's a Texas Sheet Cake recipe out there for it. One thing all these cakes seem to have in common is that they are big and flat (baked in a jelly roll pan) and all have some sort of icing. They also all use a melted butter method which is foreign to me as I've always made cakes by creaming the butter first. Hmmmm? Well, I like cake. I like icing. And, my Moms is from Texas so I figured I'd find out what all the fuss is about.

Chocolate Sheet Cake with fudge icing seems to be the most popular recipe out there. And, I've heard raves about Pioneer Woman's Chocolate Sheet Cake, it has pecans! But, believe it or not, I wasn't really in the mood to make a chocolate cake. I know, cray cray, you say. But as much as I love chocolate I also love all things vanilla. So I decided to go with this White Texas Sheet Cake with Chocolate Fudge Frosting. Check it out. . .

Sunday, March 9, 2014

The Basics: Swiss Buttercream v.2


I have a new blog crush: The Woodland Bakery Blog. I used to watch Gretchen Price's "Crumb Boss" videos on You Tube then got distracted and forgot about them. You know, busy mom, busy life, yadda, yadda, yadda. Then, for some unknown reason, I remembered about them last month and went looking for them again. I was so glad to discover that she'd converted the "Crumb Boss" channel to the "Woodland Bakery Blog/You Tube" channel. I LOVE, LOVE, LOVE, all her videos and so far all the recipes I've tried. She really knows what she's talking about but presents it in such a easy going way. No snooty, snobby, uppityness on her blog. Just great recipes presented in a easy to follow and fun way. I love it, I may even pull a "Julie/Julia" thing and blog my way through all her recipes. Maybe, when I come across all that extra time I seem to have misplaced.

Anywho, I was intrigued by her Swiss Buttercream recipe and decided to try that first. My first love is still Nick Malgieri's "Easy Meringue Buttercream", but I've always been wary of piping with it, specifically roses, things that need a stiffer texture to retain their shape. For piping roses, I loved the way the icing we used at the grocery store performed, the texture was perfect. The taste not so much. Kind of gritty, and basically just shortening and sugar. YUCK. Pretty similar to Wilton's basic buttercream recipe, perfect for piping but greasy, overly sweet and not much real flavor. Gretchen's recipe looked to be a hybrid of the two recipes. It had the egg white "Swiss Meringue" preparation of Nick's recipe, and the shortening/powdered sugar combo of the Wilton recipe. Could it deliver the right combination of taste and texture? Let's find out. . .

Wednesday, December 11, 2013

Gingerbread House Cookies


Last Christmas I spotted these cookie cutters in the holiday section of my local grocery store. I had to have one. I couldn't wait to make mini houses and I love the simple genius and efficiency of this cutter. Even though it was only $5, I'm a cheapskate and I was on a tight budget last holiday season (who isn't) and was trying to be really good about impulse purchases. So I passed on them. Then a week or two past Christmas, I was browsing through the clearance bin of that same store and discovered there were 3 of these cutters left, priced 75% OFF. OK, that was it, I couldn't resist. I snatched them up. Then sat a waited, a whole year, to try the recipe, post it for all of you AND. . . give the two extra cutters away. Yep, two lucky readers can have one of these all for themselves. Wahoo. But first, check out how cute these little houses turned out. . .

Friday, February 22, 2013

Pecan Coconut Cake


I recently had a birthday. But, I'm at that age where you don't really get worked up about your birthday. That age where you stop wanting to admit that you are a year older because those years seem to be coming sooner and sooner.  That age that seemed about 100 years away when you're in your twenties. Not that I'm afraid to age. As I look at things, life keeps getting better and better. I'm enjoying the wisdom that comes with age. That feeling of accepting yourself for who you are and celebrating that person. I've found that as I age I'm more able to let go of the things that just don't really matter. It's so relieving. Life is easier. Or maybe I'm just better at managing it. I would embrace the aging process except for those darn wrinkles. And age spots, and grey hair. I could do without that! Fo show!

“Honey, time marches on and eventually you realize it is marchin’ across your face” 

One thing that I do love about my birthday is making my own birthday cake. I really do enjoy it. Believe it or not, it's how I want to spend my birthday. And, as I've aged, I'm leaning away from chocolate desserts. Now, don't get me wrong. I still like chocolate, I haven't gone completely off the deep end. It's just that I'm starting to like a variety of desserts. Lately I'm particularly fond of things with nuts. So, this year I picked a Pinterest find. It had vanilla, yes! Coconut, Yes!! And pecans, YES!!! All my faves. I had to give it a try. . .  

Thursday, January 31, 2013

A Semi-Success

In a perfect world I'd cook and blog full time. I'd have a team of assistants and an awesome professional kitchen. We'd come up with out of this world ideas for fantastic foods then test and retest and tweak until it was the most wonderful thing ever made. It would be paradise and everything on this blog would be a culinary home run. I'd have a book deal and my own Food Network show. In a perfect world.
But. . .
It isn't a perfect world. . .
And I don't have a team of assistants. . .
Or a professional kitchen. . .
Or a book deal. . .
Or my own show on the Food Network. . .
Or the time or resources to test and retest and tweak. . .
Or blog full time. . .
What I am is a full time wife and mother, a part time bank teller, sometime helper for the Little League, owner of two cute mini dachshunds and hobby blogger. So, unfortunately I don't have the time and resources to make a recipe 5 or 6 times until it's just right. I barely have time to make them once. For the most part, the recipes I post here, I've made before. Or it's someone else's recipe that I'm reasonably sure will turn out. And they do. But every now and again, I have a flop, or a semi-flop, like this week. Remember Mandelhoernchen Melancholy?  I call this week's recipe a semi-flop because I tried two new recipes, one worked and the other didn't.

I had this cockamamie idea for my husbands birthday cake. Every year, when I ask him what kind of birthday cake he wants he always says: "I don't need a cake, why don't you make me some chocolate chip cookies." Seriously dude, no cake on your birthday? Not on my watch. So I decided to make a Chocolate Roll Cake (or Swiss Roll) with Chocolate Chip Cookie Dough Swiss Meringue Buttercream filling. My friend Dina and I had made a Pumpkin Roll Cake back in November with great success and I was reasonably sure I could pull it off again. I chose to go with the cake part of this recipe from Martha Stewart. As for the filling, I've seen TONS of recipes for Chocolate Chip Cookie Dough Buttercream all over the web lately but they ALL are powdered sugar based buttercreams. I am a steadfast believer in Swiss Meringue Buttercream. It's my totes favorite. So I took a leap and replaced some of the sugar in my favorite buttercream recipe with brown sugar. Added vanilla flavor and then stirred mini chocolate chips in at the end. Wanna know how it all turned out?

Tuesday, November 20, 2012

Honey Spice Roll Out Cookies


If you live in Northern California and you're over the age of 30, you most likely remember the Nut Tree. It was just about half way from the San Francisco Bay Area and Sacramento and my family always stopped for lunch on our way to and from those areas. I have great memories of the "back and forth" animals, my favorite was the giraffe; watching airplanes take off from the small airport; exploring the gift shop; and eating at the Coffee Tree Restaurant across the street. As a kid I loved that they had colored crystal sugar on every table. My most favorite thing of all was the giant decorated honey cookies that were sold there. If my sisters and I were really good, my parents would buy one for each of us. There were so many designs to choose from and once you picked a cookie they would write your name on it in icing right before your very eyes. For an 8 year old, that was quite a treat.

The old Nut Tree is long gone, it's all torn down and a suburban strip mall stands where it once was. They still have the big sign but it just isn't the same. Jamba Juice, Peet's Coffee, Marshall's and other corporate strip mall standards just don't have the charm that the Nut Tree and Coffee Tree once did. But, alas, that's progress. Far be it from me to stand in the way. You can however capture a bit of the Nut Tree charm by recreating those wonderful honey cookies. I found the recipe in the newspaper several years ago and was delighted to find that they tasted exactly as I had remembered. These cookies stay soft and chewy, almost cake like, and so they pair well with the hard royal icing decoration. They are great for decorated holiday cookies, the cinnamon and clove gives them a flavor reminiscent of gingerbread. If you really want that true Nut Tree Honey Cookie, give yourself a couple of days to make these. The flavor and texture of the cookies is much better if the dough sits in the refrigerator for a couple of days. So grab your favorite cookie cutters and bring back a bit of the past. . .

Friday, September 21, 2012

All Scratch Yellow Cake


When making cakes I've always used cake mix for the actual cake spending more of my time on making the fillings, buttercreams and glazes from scratch. Seriously, cake is just a delivery medium for frosting and filling as far as I'm concerned. Duncan Hines mixes are my favorite. I've tried other brands but I just don't like them as much. And when you have some elaborate decorating to do, mixes just save time. I also think they taste pretty good. I've had no complaints. All that being said, I've always felt that I should migrate towards making the cakes from scratch as well. 

After the success of the Blue Velvet cupcakes (the cake was so moist and flavorful) I though I'd give another scratch cake recipe a try. I had seen Bakerella's post about the perfect moist yellow cake and decided that was as good a place as any to get started. Because I wanted the whole cake to be "from scratch"* I paired it with a fudgy homemade chocolate icing. A classic All American Cake. Not a fancy schmancy bakery cake but one like your grandma might have made back in the day. See what you think.
*My son quickly pointed out that it wasn't ALL from scratch because I didn't make the sprinkles. Can you forgive me?

Friday, April 13, 2012

"Vista" Blue Velvet


I discovered a new blog a few months ago: Sprinkle Bakes. I've been having a good time poking around on it. It speaks to me. It's quirky and colorful. It's written by Heather; an artist turned self taught baker and a southerner. I instantly liked her. (Well, I've never met her, but, if she has half the personality of her blog, then she must be quite a character.) Maybe we'll meet someday. What I love about Heather's blog is her love of color. And, well, I love color. She also has a great sense of presentation. And, well, I like a great presentation. I think it's the graphic designer in me. Don't get me wrong, first and foremost, I want what I make to taste great. Not just great, I want it to blow your hair back. But, I also like food to be pretty. I want you eyes as well as your taste buds to say "WOW"!

I've been saving recipes from her blog and intending to make them for a few months now. When I discovered her post for Blue Velvet Cupcakes. . .that's right "blue" not "red" velvet. . .I knew it was the first thing I wanted to make. Why? Well because my daughters high school is "Vista", and their colors are Navy Blue and Silver and their rally cry is "Vista Bleeds Blue"! Then it hit me: "Vista Blue Velvet". I couldn't resist the alliteration. I'm weird like that. I'm kinda ashamed I didn't think to make Blue Velvet before. It's really not much of a leap from Red Velvet. Truth be told you could swap out the red coloring in Red Velvet for just about any color. So Blue Velvet it is. . .

Friday, July 29, 2011

Decorated Sugar Cookies


You most likely saw these cookies in my last post. And by the way, aren't they the coolest cookies in the galaxy? (More on my Star Wars affection later. It will be worth it, I promise.) So this time out I'm going to show you how to decorate sugar cookies. It's really not that hard. There are a lot of steps though, so I'm going to dispense with the chit chat and get right too it.

This is my preferred method to decorate sugar cookies for lots of reasons. You can add detail with royal icing right away because you don't have to wait for the background to dry. The colors don't bleed into the background. The covering is firm enough to stack or wrap the cookies but is still soft when you bite into it. It's cheaper than using fondant and it tastes good, like marshmallow. Yum!

To start you'll need some sugar cookie dough for rolled out cookies. Use your favorite recipe, one that doesn't spread when baked. You could also use this recipe from the William Sonoma web site, it's the one the comes in the package with the Star Wars cookie cutters. I've also heard good things about Martha Stewart's recipe found here, but I've never actually used it. You'll also need a batch of marshmallow dough and some royal icing.

On a weird side note I don't share my rolled out cookie recipes. I share ALL my other recipes. I know, it's kind of weird. The reason is two-fold. First it's taken me a lot of time and effort to develop recipes that are both flavorful and sturdy enough to hold up to decorating, packaging etc. Second I have a cockeyed dream that one day I'll run my own custom cookie business and to that end I'd like to keep the recipe a secret.
I know, it's weird, I hope you understand.

Here is some of the essential equipment. A sturdy rolling pin. This one is just a long straight one, no handles, no tapered ends (that's a French Rolling Pin) and it's my favorite. I also like to use these "spacers". Two pieces of wood approximately 24 inches long, 1-1/2 inches wide and exactly 1/4 inch thick. The nice man in the lumber section of Home Depot cut these for me (Make sure the wood is non-toxic, I choose maple, and that it hasn't been "treated" with any chemicals. Ask lots of questions and let them know what you are using it for!) After getting the wood cut, I sanded them lightly with fine sandpaper then gave them a good rubbing all over with vegetable oil to help preserve the wood. They wash and dry great, just like a rolling pin. Whew. . .lots to go over here. I also like this small strainer for sprinkling the flour. Lastly I'm using a Corian cutting board as a rolling surface but you can use your counter top if it's suitable or the back of a sturdy sheet pan. 


Set the spacers about 8-10 inches apart on your rolling surface and sprinkle the surface generously with flour.


Lay out the cookie dough and give it a good dusting of flour as well. Pre-form the dough so when you roll it out you get a oblong piece of dough rather than a big circle.


Roll out the dough resting the rolling pin over the wood spacers and applying pressure to the rolling pin over the spacers, not over the dough. Your done when the rolling pin is resting completely on the spacers and the dough no longer expands as you roll. Now you have a perfectly even sheet of 1/4-inch thick dough. It's magic! Just don't forget to flour as you go to prevent the dough from sticking.


Now cut out whatever shape you like. Generally I only "re-roll" scraps once. Beyond that the dough tends to get overworked and tough. Use your judgement.

Note: I'm showing one cookie design for the cookies and another for decorating. Sorry, I took the pictures during two different baking/decorating sessions. Neither group of pictures showed the complete process so I used a combination. I'm sure you'll get it.


Transfer the cookies to a rimmed, silpat lined cookie sheet using a spatula if necessary to keep the cookies in shape.


Bake according to your recipe and cool on a wire rack. Cookies are usually done when the edges just start to color.


Now on to decorating. To color the marshmallow dough use gel or paste food color, not liquid. Adding a small amount and kneading it in. Keep the board, and your hands, well dusted with confectioners sugar or corn starch.


Keep kneading (adding more food color if needed.) until the color is uniform and is just a shade lighter than you want. It will darken as it cures.

Note that most likely your hands will get stained, especially if you are using dark colors. I've tried using gloves but they are just too cumbersome. Since I work in a bakery, as a cake decorator, my hands are usually stained with one color or another, it's just an occupational hazard. It usually wears off within a day or two. Good luck!


Next roll the dough out to approximately 1/8-inch thick. Cut your shapes using the same cutter that you did for your cookies. These cookie cutters had an embossing feature so I used that as well to add in some of the details. Make sure there is a light dusting of powdered sugar on the dough so it won't stick to the cutter. 


To "glue" to marshmallow dough to the cookie use a pastry brush and some corn syrup. Brushing a light coating on the cookies and then laying the dough on, in position, and applying a light bit of pressure.


For dark pieces you can remove the "white" bits (sugar) by lightly brushing with a barely damp pastry brush or wipe gently with a lightly damp paper towel.


Add details with royal icing. You can do this right away as the marshmallow dough is "dry". Once the royal icing has set up, a good couple of hours or more, you can stack or wrap the cookies without damaging the design. Have fun with it!

Friday, July 22, 2011

The Basics: Marshmallow Dough


I've got a quickie for you this week. And here I am, just under the wire. Again. Another busy busy week. I keep waiting for "things" to slow down but I'm slowly coming to the realization that that may never happen. This is it, the pace of our life. Soon enough I'll be complaining that my children are all grown up so I guess I'll just shut it and enjoy the ride. Wheeeeee!

This week, I've got a super simple. I mean SUPER SIMPLE recipe for you. Two ingredients simple. Some may call it Marshmallow Fondant but I've seen recipes for that and it involves melting marshmallow, adding stuff, mixing, greasing, bla bla bla. Way too much work. I call this "Marshmallow Dough", or "Poor Woman's Fondant". I've used it in place of traditional (i.e. EXPENSIVE) fondant and it works like a dream. I've covered cakes, decorated cookies and sculpted roses. The only difference I've seen between this handy concoction and fondant is the cost (way cheaper) and flavor (way better, tastes like marshmallows). So mix some up and get to experimenting. I'll post later on how to cover cookies so stay tuned.

Here's all you need: 1 jar marshmallow creme (7oz.-ish) and powdered sugar (3-1/2 cups to start and more for kneading and dusting.)

Just dump it in a bowl and start stirring. Takes a bit of elbow grease but keep working it until all the sugar is incorporated. Half way through you'll be convinced that you have too much sugar but KEEP GOING. It will get there. You may have to get your hands in there (dust them with powdered sugar) and knead it, do what ever you have to do, just get all the sugar worked in.

Alternately you can use the dough hook on your mixer. BUT. . .make sure you have a pretty powerful mixer; only use the dough hook, NOT the beater or whip; and watch your mixer close to make sure it's not stressing the motor. If it starts sounding or smelling funny, turn it off IMMEDIATELY! Do not use a hand mixer, you'll burn it out. OK, fair warning.

Half way through it will look crummy, like this. But keep going.

Eventually it will look like this. If you aren't using it right away wrap it tightly in plastic wrap and then in a zipper bag, squeezing out all the air.

I really like this for covering cookies because it's firm enough that you can stack or wrap the cookies but it isn't completely hard when you bite into it. I used it on these cookies adding the detail with royal icing.

And these cookies, possibly the coolest cookies in the universe. I'll show you how I did it later next week. For now, mix up a batch of marshmallow dough and play around.

Marshmallow Dough
1 jar marshmallow cream (7oz.)
3-1/2 C. powdered sugar.

Combine marshmallow cream and sugar in a large bowl stirring until most of the sugar is incorporated. Finish working the sugar in by kneading. Wrap tightly until ready to use.

Tuesday, June 14, 2011

The Basics: Royal Icing


Royal Icing can be tricky. Mostly because you have to be very careful with the equipment you are using. The ingredients are pretty simple, it's the procedure and equipment that are the keys to success. Royal Icing is great for make ahead decorations or "run-in" designs. Once dried, it is hard and crunchy and will keep for a very long time. (Although I wouldn't recommend it.) It isn't creamy or flavorful so I only recommend it for decorations, flowers, and cookie decorating. The only flavor it has is "sweet", unless you add some extract to it (but NOT oil based flavors, I'll go more into that later.) It works really well on rolled-out sugar cookies because it dries hard and you can stack the cookies together without messing up the decoration. Lastly, once dried it doesn't need refrigeration. 

About the equipment. Royal Icing owes it structure and texture to the egg whites, which are protein. One tiny bit of fat (yoke), grease, oil, butter etc. will cause the structure of the protein to break down and you'll just get a soupy mess of egg and sugar. Plastics are a by product of petroleum distillation, which means they are polymers derived from oil. Whenever you use a plastic utensil or vessel for anything that contains fats or oil a small bit of that fat/oil will bond (on the molecular level) with the container or utensil. That's why you can't get those spaghetti sauces stains off your plastic. Make sense? So what does that mean when making Royal Icing. It means that you need to be certain that nothing you use (bowl, spatula, whip, icing bag, icing tip, etc.) has any traces of fat on it. For glass and metal equipment, just simply wash in very hot soapy water, rinse in a vinegar-hot water solution and then rinse again in just hot water and let dry completely. For plastic equipment you have to be certain it's never ever been used with anything that contains fat or oil. If you don't make Royal Icing often, just stick to metal and glass equipment. I make Royal Icing quite a bit, so I have bought a set of spatulas and serving savers and marked them "ROYAL ONLY" with a sharpie marker. OK, enough with the science lesson, I think you get it, so let's get started.

Here is all you need: Powdered Sugar and egg whites. I like the powdered ones because there isn't any chance of contamination by bacteria or egg yoke (fat). One itty bitty bit of egg yoke and your icing will not work. Wilton and Ateco make "Meringue Powder" which a lot of people like to use. Wilton also has a product called "Color Flow" which leaves a shiny finish when dry. They will all work with the procedure below but they have other ingredients/additives in them that aren't really necessary and that I'm not interested in having in my icing.

Start by putting your egg whites and powdered sugar in a mixing bowl with the whip attachment.

Add water and whip until thick and creamy. This can take 7-10 minutes. This is where you'd add flavor if you are using it. Make sure the extract isn't oil based. Lemon extract or lemon juice work well. Vanilla works but will give your icing an off-white color.

It's done when it holds a peak or the marks left by the beater for at least a count of ten. OK, that's it, you are done making the icing. Super easy! Now here's how to use it.

I was making a bunch of small drop flowers to decorate the tops of mini cupcakes and I needed 4 different colors. Divide the icing into 4 grease free, containers.

Royal Icing tends to form a crust pretty quickly so I lay a bit of damp paper towel right on top of the icing.

Cover with a tight fitting lid. Keep them covered at all times. Use gel (NOT OIL BASED) colors starting with just a small bit of color and adding more as needed until you get the color you want. NOTE: Icing will darken a bit as it dries so mix it just a shade lighter that you'd like.

To pipe, I like to use these disposable bags. And here I'm using a Wilton #2 tip.

Snip off the end of the bag and insert the tip, stretching the bag a bit at the end to make sure you have a snug fit.

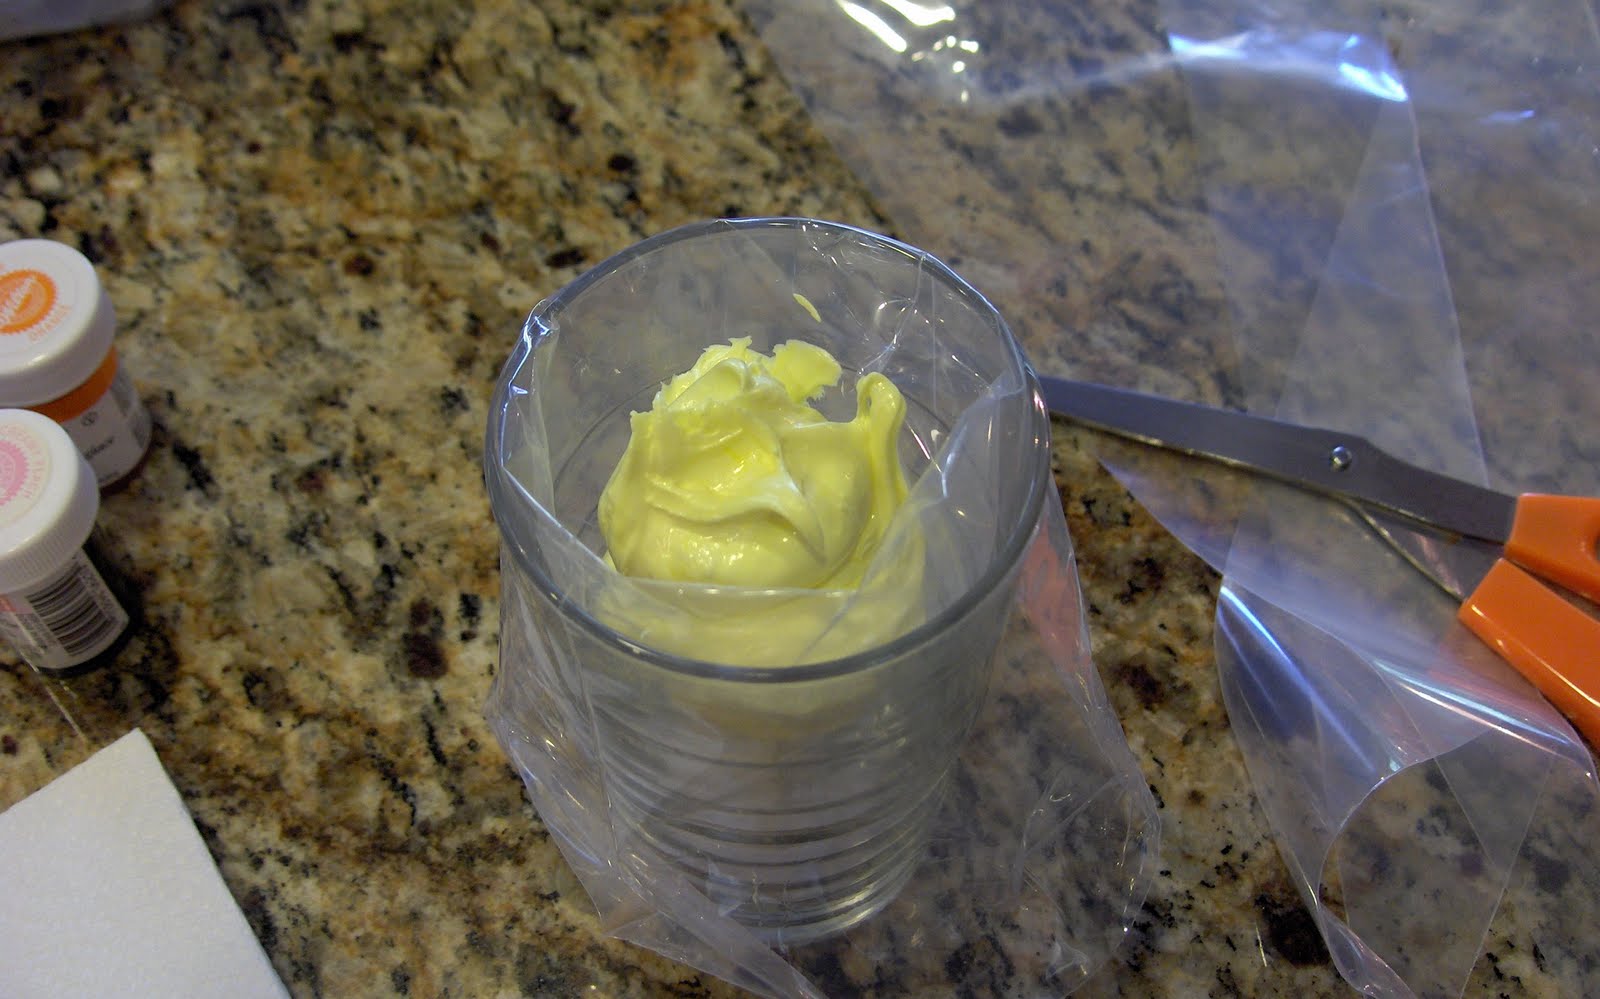
To fill the bag, set it, tip down, in a glass and fold the top of the bag back over the glass. Makes for easy filling.

Scoop in the desired amount of icing. Then fold the top of the bag back.

Give the end of the bag a twist and wrap the tip with a damp piece of paper towel while you set up the rest of your colors and bags.

I needed to make uniform sized drop flowers so I printed out a bunch of circles (1/4, 3/8 and 1/2 inch) on an 8.5x11 piece of paper. Lay your template down on a flat surface. I'm using a particle board cake board that I got at the cake supply store but you can use the back of a cookie sheet. Securely tape a piece of parchment paper over the template.

When piping your flowers pinch the twisted end of the bag in the crook of your thumb to keep the icing from coming out of the top end. Squeeze with a downward motion (index finger, middle finger, ring finger) to send the icing out in the direction of the tip. Kind of like milking a cow. Like I've ever milked a cow, ha ha. You get the idea.

Start piping your flowers using the circles as a guide. I choose to use the 3/8 inch circles and pipe a 5 petaled flower with a white center.

Now just start piping away until you have as many flowers as you need. Probably a good idea to pipe some extras just incase some break, which a few always do. Set aside to dry completely. This takes about 24 hours and they should no longer look shiny. If you've made something a bit thicker let it dry longer. Once completely dry they can be stored in a zipper bag (a couple of weeks or more) until you are ready to use them. Careful, they are delicate and can break so store them someplace safe.


Royal Icing
3 T. dried powdered egg whites
1 lb. powdered sugar
6 T. water

Beat all ingredients on medium speed until icing forms peaks. (7-10 minutes)
Cover tightly until ready to use. If icing separates re-beat before using.