Showing posts with label Holiday. Show all posts

Tuesday, December 23, 2014

White Chocolate Peppermint Cheesecake


Here's a last minute idea for Christmas dessert. White Chocolate Peppermint Cheesecake. Oh Boy! Cheesecake is one of my all time favorite desserts. Any kind really. As long as its cheesecake and this one fits the bill for the holidays. A smooth mellow white chocolate batter, spiked with peppermint extract, sprinkled with crushed candy canes and sitting atop a chocolate Oreo crust. This will last a few days so making it now is a good option. It also freezes beautifully. I actually froze it, cut it into serving sizes, wrapped those tightly in plastic wrap, and popped them back in the freezer. Single servings of cheesecake anytime I want. It IS Christmas. 

I've adapted this recipe from my current blog crush "The Woodland Bakery Blog". Go check out Gretchen's tips for cheesecakes, they are invaluable. Although this recipe is step intensive it doesn't really have any fancy technique. It's pretty hard to mess it up. So in the interest of time, let's get to it. . .

Monday, April 28, 2014

Baked Churros


One thing I haven't quite figured out for this blog is timing posts for the holidays. Getting holiday recipes tested, photographed and posted in time for all of you to make them for the current holiday. Time just gets away from me and the next thing I know, I'm posting a Thanksgiving pie recipe in December. Too late! So far this year I've missed it on Valentine's Day and Easter. OK, room for improvement, I know. When I saw this post for Baked Churros on Pinterest I decided to end my losing streak and author a timely post for Cinco de Mayo.

Aside from the fact that I'm a good week away from Cinco de Mayo and this recipe is fitting, I couldn't pass up the chance to make churros. I really love churros but I hate to fry food at home. Notice I didn't say I hate fried food, I said I hate frying food. Big dif. I love fried foods but they are just such a pain to make at home, so messy and too much clean up. So a baked version of the churro seemed doable. Really it's pretty much a choux paste like is used in a cream puff or eclair. It just doesn't expand quite as much but the technique is basically the same. Check it out. . .

Tuesday, December 17, 2013

Holiday Favorites, A List. . .

I've put together a simple list of great holiday treats to fill your gift baskets or take on over to a holiday get together. They've all worked well for me and I'd make them again and again, and I will. Most are pretty simple to pull off but won't disappoint. To try any of them out, just click the link and it'll take ya on over to the recipe.
Merry Christmas!
Becky

Festive and simple. . .Ribbon Cookies

No baking required for these Toffee Sticks

Pistachio Cranberry Icebox Cookies, nutty, buttery and tart.

English Toffee, butter, sugar and almonds, enough said!

Chocolate Cherry Cookies, one of my favorite combos.

Chocolate Cherry Shortbread a simplified version of above which I actually prefer.

Nutty Nougats, if you miss the Archway version, these come close.

Rugelach, Jewish yes, but why not for Christmas too?

Peppermint Marshmallows, impress your friends with these.

Crispy Date Bars, these are a crowd pleaser.

Chocolate Pecan Florentine Cookies, delicate and crispy.

Happy Holiday Baking!

Wednesday, December 11, 2013

Gingerbread House Cookies


Last Christmas I spotted these cookie cutters in the holiday section of my local grocery store. I had to have one. I couldn't wait to make mini houses and I love the simple genius and efficiency of this cutter. Even though it was only $5, I'm a cheapskate and I was on a tight budget last holiday season (who isn't) and was trying to be really good about impulse purchases. So I passed on them. Then a week or two past Christmas, I was browsing through the clearance bin of that same store and discovered there were 3 of these cutters left, priced 75% OFF. OK, that was it, I couldn't resist. I snatched them up. Then sat a waited, a whole year, to try the recipe, post it for all of you AND. . . give the two extra cutters away. Yep, two lucky readers can have one of these all for themselves. Wahoo. But first, check out how cute these little houses turned out. . .

Thursday, November 21, 2013

Holiday Ribbon Cookies


And so, it has begun. The holiday baking season. So let's start out with something totally easy that looks pretty impressive: Ribbon Cookies. If you've been reading my blog you may have read my post for Candy Corn Cookies. They were great and I told you I'd be fiddling around with the recipe. And so I have. I basically took that same recipe and changed the colors from yellow and orange to red and green. I also simplified the layering of the dough. Just smoosh it into a pan rather than rolling and shaping and bla bla bla. Easy peasy. An added bonus is that you can make the dough a week or two ahead, layer it in the pan and then freeze it until you are ready to bake the cookies. Kind of spreads the holiday baking frenzy out over a couple of weeks. So what are you waiting for, get your Holiday Bake on. . .

Monday, March 11, 2013

Colcannon


I haven't had too much luck with this blog in baking/cooking ahead for holidays. Meaning, cooking a holiday dish a week or two ahead of the actual holiday. I'm always cooking holiday dishes on the holiday in question. Then by the time I post the recipe its too late. The holiday has passed us by.
But not this year. . .
Not with St. Patrick's Day just a week away. . .
This time I planned ahead. . .
It's the dawn of a new era at Becky Bakes and Cooks. . .
Er, too dramatic? Ok, I'll dial it back a bit. Point is, here is an Irish dish that you can make for St. Patrick's Day. I'm giving you a whole week to check it out, get your ingredients together and get cookin'. 

You might have expected a post for Corned Beef and Cabbage. But, truth be told, I don't really like corned beef. Too salty. And cabbage, too bland. I've tried a couple of times to make Corned Beef and Cabbage, and while it sounds fun and festive, it just never seems to be that exciting, or tasty, when it hits the table. An Irish dish I do like is Colcannon. Never heard of it? Come on! It's probably more authentically Irish than Corned Beef. It don't really know for sure 'cause I ain't Irish. What I do know is, we all like it and that's good enough for me on St. Pat's Day. See for yourself. . .

Tuesday, February 12, 2013

Toffee Sticks


I was going to title this post "Valentine's Day Quickie." Then I re-thought that. Hmmmm, no double entendres for this family friendly blog. So, I went with Toffee Sticks. Which, by the by, are super duper easy. And, quick. If for you, like me, Valentine's Day has crept up on you and you're totally unprepared, you can whip up a batch of these in no time. If you followed the Oreo Cookie Pops post and/or the Chocolate Caramel Pretzel post, then you totally know what you are doing here. Just dippin' stuff in Chocolate. . .

Friday, December 21, 2012

English Toffee

When I was a kid, my mom's favorite candy was Almond Rocha. The distinctive pink round tin, the little gems of butter, almonds, chocolate and sugar wrapped in gold foil. They were so fancy to this suburban kid. Any it was expensive, or so my mom said. So every once in a while, she'd splurge and buy some, and stash it somewhere to be enjoyed solo. A private moment of indulgence, just for her. And then. . . one day. . . I found her stash. And as much as I'd like to say "I didn't", I did; I pilfered one and scarfed it up. Then expertly disposed of the damning gold foil evidence. So tender, so buttery, so forbidden. I was hooked. I was instantly an "English Toffee Junkie". But to feed my new desire, I would have to be careful. If I pinched it all, I'd be caught. So I waited, and waited before pilfering another piece. Never letting on that I'd found the stash. Oh the cleverness of me. Eventually I quit lifting from mom's stash. A little maturity and a lot of guilt bettering my addiction. I wonder if my Mom every knew. She may have and never let on. We'll never know. Mom was like that. I miss her!

Imagine my delight when my friend Amy shared her grandma's family recipe for English Toffee. I could now make this once forbidden treat for myself. What I love about this recipe is it's simplicity. Just a few ingredients and some patients and you'll have English Toffee for yourself. It's getting close to Christmas but it's not too late to whip up one last batch of treats. . .

Tuesday, December 11, 2012

Pistachio Cranberry Icebox Cookies


One of my favorite holiday traditions is baking up a bunch of treats for family, friends and neighbors. Each year I include our traditional favorites and try to throw in a few new recipes. But, this year, I've been set back a bit. The break in was upsetting to say the least and it took me a good week to settle back in and get on the holiday organizing, gift lists and treat making. So much for that "extra" week after Thanksgiving. I finally feel like I'm back "on track" and ready for some Holiday Cheer.

When I saw this recipe on Pinterest a couple of months ago, I knew I wanted to give it a try. I loved that it had cranberries and pistachios, red and green, and it just screamed "Christmas" to me. A "Slice and Bake" refrigerator cookie is so up my alley this season. I love the idea that you can make up batches of dough, weeks in advance, and then slice and bake as needed for all the various holiday parties and get togethers. I new immediately when I saw it that I'd like this recipe. What I didn't know is that I would LOVE it. Aside from the fact that it is very easy to make, I love love love the taste. The cookie itself is a tender shortbread that's not overly sweet. It has the perfect amount of cinnamon to spice it up without being a "cinnamon cookie." The pistachios and cranberries compliment each other well and then the orange zest just takes all the other flavors to the next level. Don't skip putting the crystal sugar on the outside before baking. It adds just enough sweetness and crunch. I dare say this cookie may make it onto our "traditional favorites" list. Give it a try and see if you don't agree. . .

Tuesday, November 20, 2012

Honey Spice Roll Out Cookies


If you live in Northern California and you're over the age of 30, you most likely remember the Nut Tree. It was just about half way from the San Francisco Bay Area and Sacramento and my family always stopped for lunch on our way to and from those areas. I have great memories of the "back and forth" animals, my favorite was the giraffe; watching airplanes take off from the small airport; exploring the gift shop; and eating at the Coffee Tree Restaurant across the street. As a kid I loved that they had colored crystal sugar on every table. My most favorite thing of all was the giant decorated honey cookies that were sold there. If my sisters and I were really good, my parents would buy one for each of us. There were so many designs to choose from and once you picked a cookie they would write your name on it in icing right before your very eyes. For an 8 year old, that was quite a treat.

The old Nut Tree is long gone, it's all torn down and a suburban strip mall stands where it once was. They still have the big sign but it just isn't the same. Jamba Juice, Peet's Coffee, Marshall's and other corporate strip mall standards just don't have the charm that the Nut Tree and Coffee Tree once did. But, alas, that's progress. Far be it from me to stand in the way. You can however capture a bit of the Nut Tree charm by recreating those wonderful honey cookies. I found the recipe in the newspaper several years ago and was delighted to find that they tasted exactly as I had remembered. These cookies stay soft and chewy, almost cake like, and so they pair well with the hard royal icing decoration. They are great for decorated holiday cookies, the cinnamon and clove gives them a flavor reminiscent of gingerbread. If you really want that true Nut Tree Honey Cookie, give yourself a couple of days to make these. The flavor and texture of the cookies is much better if the dough sits in the refrigerator for a couple of days. So grab your favorite cookie cutters and bring back a bit of the past. . .

Wednesday, October 17, 2012

Chocolate Caramel Pretzels


I love sweet things. . .
I love salty things. . .
I love chocolate things. . .
I love caramel things. . .
I love salty, sweet, chocolaty, caramely things that are super easy to make and festive.
I love this recipe/project.

These Chocolate Caramel Pretzels fall into the same category as the Oreo Cookie Pops. Super duper easy to make but impressive. I call it a project as much as a recipe because you're really just putting stuff together. There are a lot of chocolate dipped _________ (fill in the blank) projects out there on the web but I like to take these pretzels a step further and add caramel. Sure I like chocolate, who doesn't? And a Chocolate Dipped Pretzel is the perfect marriage of chocolate, salty and bread. But . . . add caramel and they are out of this world. As far as I'm concerned, you could put caramel on just about anything and I'd eat it. It amazing how you just apply heat to regular old sugar and it becomes caramel. A true miracle. Well actually it's science, but I prefer "miracle". 

You can customize these with any combination of chocolate (or colored Wilton Candy Melts) and sprinkles for any occasion. Since it's October, I went with Halloween. Change it up and make it your own.

Monday, February 13, 2012

Two Ingredient Fudge


I've been perusing a lot of cooking blogs as of late and have discovered some new ones. My "recipes to try" file is seriously getting out of control. When my exploration led me to this recipe my interest was piqued. Seriously, "Two Ingredient Fudge". I had to try it. The super cute pink hearts certainly had something to do with it. To say I was skeptical is putting it mildly. It really couldn't be that easy. Two ingredients? I mean really, two ingredients? Could fudge be that easy? Have I been putting way too much effort into it all these years? I simply had to try it out. Here's how it went. . .

OK, I know, I said 2 ingredients and I'm showing 3. But, the sprinkles aren't really part of the recipe. What you do need is a can of frosting and a bag of chocolate chips.

Spray a 9x9 pan and line with a double thick strip of waxed paper. Spray the waxed paper as well. This will help you lift the fudge out of the pan in one big piece.

On the top of a double boiler (or in the microwave) melt the chocolate chips.

When they are all melted and smooth, remove from the heat.

Add the entire can of frosting and stir until both ingredients are completely combined.

Pour into the prepared pan and smooth flat. If you want to use sprinkles put them on before the fudge is set. Put the pan in the refrigerator for at least a 1/2 hour to set up.

Here is the chocolate (much tastier) version. Run a knife around the edge of the pan to loosen the fudge. Pull up firmly on the wax paper to remove the fudge from the pan. Use a sharp knife to cut into squares or use a cookie cutter for festive shapes.

OK so my kids and husband liked both flavors but preferred the chocolate. Me, they were both a bit sweet and the strawberry was way, way too sweet. But, to be honest, I don't really care for the strawberry frosting to begin with. And, really, I'm not big on fudge. That being said, the texture was pretty fudge-like and you can't beat how easy this recipe was. (Let's just not think about all the funky stuff in canned frosting. YIKES!) It would be great for a Girl Scout or Boy Scout cooking project, a camping trip or an in-class demo for grade schoolers. The combinations of "chips" and frosting are endless: peanut butter chips and chocolate frosting, butterscotch chips and vanilla frosting, etcetera, etcetera, etcetera. All and all I give this recipe a 10 for ease of preparation and a 7 for taste. 


Me, I'll probably stick to the Fantasy Fudge recipe on the back of the marshmallow fluff jar. But, if you need a quick and easy treat for Valentine's Day, give it a whirl.


Here is a link to the post where I got the recipe.

Monday, January 23, 2012

King Cake (part deux)


I know I already posted King Cake, not quite a year ago, but my good friend Sue has just relocated from New Orleans and inspired me to revisit the King Cake with some changes. I also wanted to post a more timely recipe. Now is when you would traditionally serve this Mardi Gras treat. I'm no expert here, but according to Sue, in NOLA, they serve this on Fridays beginning on January 6th until Mardi Gras on February 21st. If you search "King Cake" on the internet there are thousands of versions, so who knows what is "authentic" or "traditional". It think it all depends on what you've grown up with or what they make at your neighborhood bakery. One thing they all do have in common is the three color decoration (Gold = Power, Green = Faith, Purple = Justice.). That's what really makes it a "King Cake". Beyond that, it's a sweet, breakfasty bread/cake, filled with any combination of flavors.

This time, again, I started with Gesine's King Cake recipe found here. I replaced the maple syrup with honey because I wanted a more neutral sweet flavor to the dough. I reduced, and slightly tweaked, the quantities (by about 25%) for a slightly smaller cake. (If you remember last time the finished cake was HUGE!). And lastly, I swapped out the bourbon/cinnamon pastry cream with lemon filling. Really, Gesine's pastry cream filling was absolutely delicious, I just wanted to try something different as well as reduce the steps and ingredients. I was pretty pleased with the results. I'd just do a few things different. The lemon pie filling worked well, but I like a really tangy lemon flavor, so I'd probably use a good quality lemon curd or make my own. I also think I slightly over baked my cake. It should be a more golden brown, mine is a bit dark. I will definitely make this again and my head is swimming with different filling ideas, cream cheese among them. I'll warn you his recipe is pretty step intensive and takes the better part of a day to finish, but it's a great opportunity to learn how to work with yeasted doughs. Laissez les bon temps roulez!

Here is what you need for the cake: bread flour (King Arthur is the best!), instant yeast (I always use SAF.), salt, honey, eggs (only 2, not 3.), whole milk, a lemon for the zest, vanilla paste or extract (Try to find the paste!), butter and lemon filling (Next time I'll probably use lemon curd because I like a pretty tangy lemon filling, but the filling works too.) You need a few more things for decorating and icing but we'll get to that later.

Start by stirring together the flour, salt and yeast. Use your mixer with the dough hook.

In a separate bowl whisk together the honey, eggs, milk, lemon zest and vanilla paste. I usually start by adding the eggs to the honey and getting them well mixed then slowly whisking in the milk and adding the lemon zest and vanilla last. If you dump it all together and then try to mix it you end up with a globby lump of honey on the bottom.

Add the wet ingredients to the dry and stir just to combine. Then, with the mixer going, slowly add bits of the softened butter.

Speed the mixer up and let it go until the dough pulls from the side of the bowl and is shiny and elastic. This can take up to 10 minutes. If the dough is very sticky add a bit more flour.

Proof in a well oiled, straight sided container until double in size. This will take at least an hour if not more. It took over 3 hours for me because it was a cold day. Be patient and don't try to rush it!

Once proofed and doubled in size, punch down dough and turn it out on a well floured surface.

Roll it out, flouring as needed, to a 13 x 20 inch rectangle.

Spread evenly with the filling, leaving an inch margin along the side closest to you.

Starting at the far side, roll up into a tight roll.

Pinch the edge to seal.

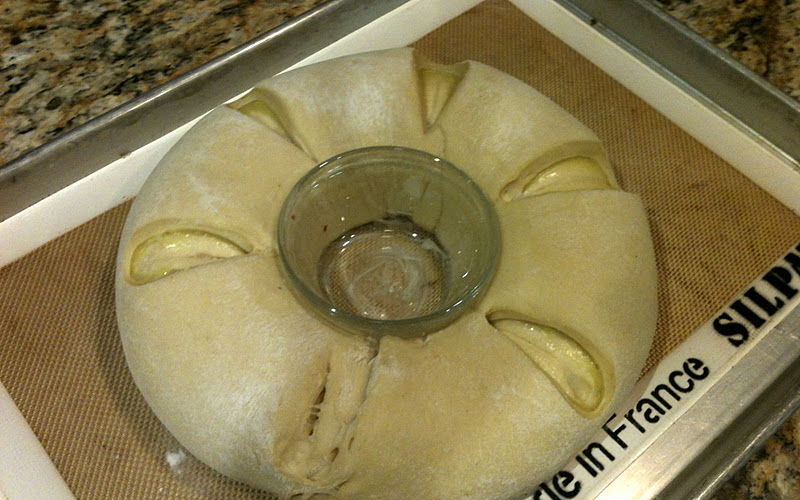
Generously butter (or line with a silpat mat) a rimmed baking sheet. Generously butter an oven-proof custard cup and form the dough into a ring around it with the seam side of the roll on the bottom. Pinch the ends together to seal. Make six evenly spaced slashes in the dough going through at least the first layer of dough.

Cover loosely and proof again until doubled in size.

For decorating you'll need one egg white beaten until loose and frothy and coarse colored sugar in gold/yellow, purple and green. Optionally you can use clear sugar.

Brush the ring with the egg white and sprinkle with alternating colors of sugar. Leave the custard cup in place for baking.

Bake in a preheated 350°F oven for about 30 minutes, just until light golden brown. I let this go a bit too long, it's just a tad dark. Using an oven mitt, remove the custard cup from the middle and let the cake cool on the pan.

To ice the cake whisk together 1 cup of powdered sugar and 1 to 2 tablespoons milk. It should be just runny enough to drizzle off a fork but not more. If you used clear sugar then divide the icing into 3 cups and color them yellow, green and purple.

Drizzle the icing over the cake using a fork. If you used clear sugar and colored icing, alternate the colors on the different sections of the cake.

Slice it up and enjoy. You could  pretty much fill this with any flavor you like. Apple, cherry, almond, cream cheese. The possibilities are endless. Give it a try!

King Cake
by Becky Elkins, adapted from Gesine Bullock-Prado

Dough:
3-3/4 C. bread flour (plus extra as needed)
1 T. instant yeast
1-1/2 t. salt
1/4 C. honey
2 eggs
1-1/4 C. whole milk
zest of 1 small lemon
2-1/2 t. vanilla bean paste
3 t. unsalted butter at room temperature

Filling:
12-14 oz. lemon pie filling or lemon curd

Decoration:
1 beaten egg white
Coarse Sugar (preferably colored yellow/gold, green and purple)

Icing:
1 C. powdered sugar
1-2 T. milk
(optional food color in yellow, green and purple)

For the dough:
Place flour, yeast and salt into the bowl of an electric mixer fitted with the dough hook attachment.  Stir the dry ingredients together.  Whisk together the honey, eggs, milk, lemon zest and vanilla bean paste.
With the mixer on low, add the wet ingredients.  When the wet ingredients are just combined, slowly add bits of the butter.  Mix the dough until it starts to pull from the sides of the bowl and is very shiny.  If the dough is very sticky, slowly add extra flour.  The mixing process can take quite a while, up to 10 minutes. Proof the dough in a straight sided container, sprayed with non-stick spray, until the dough doubles in size. (about 1 to 1-1/2 hours)

Assembly:
Generously butter a rimmed sheet pan or line with a silpat mat. Punch dough down and roll out, on a generously floured surface, into a 13x20 inch rectangle. (dough should be just under 1/4 inch thick.) Spread filling evenly over dough, leaving a 1/2-inch margin on the long side, closest to you. Roll up, in a tight roll, starting with the long side farthest from you and rolling towards you, brushing off excess flour as you go. Pinch the seam to seal. Form roll into a ring on rimmed sheet pan. To help ring hold shape, place a generously buttered ovenproof custard cup in the center of the dough ring. Make 6 evenly spaced slashes around the ring. Cover loosely and let rise again until doubled in size. (about 1 hour) Preheat oven to 350°F. Brush lightly with one beaten egg white and sprinkle with alternating colors of sugar.  Bake for 30 minutes until golden brown. Let cool.

For the icing:
Whisk together the sugar and milk until smooth. Use a fork to drizzle icing over cake.

Alternate decoration: If you don't have colored sugar, brush ring with egg white and sprinkle with coarse sugar. After baking, separate icing into three bowls coloring one yellow, one green and one purple. Then drizzle icing in alternating sections of the cake. (Green, yellow, purple, green, yellow. . .)