Showing posts with label Breakfast. Show all posts

Thursday, June 5, 2014

Nazook


A couple of weeks ago, I was perusing the bakery department at my local grocery store when I came across "Nazook". What the heck is "Nazook"? I'd never heard of it, but it looked good. Anytime the bakery department has some sort of rolled filled goodie, I can't resist. They looked a lot like Rugelach, which BTW, I love, so I assumed I'd like these as well. Did I buy them, no, of course not, I immediately ran home and Googled Nazook. Seriously, if store bought is good, home made HAS to be better. 

What I learned is that Nazook is a traditional Armenian pastry. A buttery yeast dough filled with more butter and sugar and sometimes almonds. Butter and sugar and almonds? I'm in! So I Googled a bit more, read a handful of recipes (because I don't have an Armenian Nana to show me how), watched a couple of videos and decided to give it a go. . .

Sunday, May 4, 2014

Almond Horns (Mandelhoernchen)


If you've been with this blog for a while, you may have read my "Mandelhoernchen Melancholy" post. It was a disaster and let's leave it at that. After my Almond Paste post a couple of weeks ago and the success of both almond paste recipes I was ready to give Mandelhoernchen another go. I used to get "Almond Horns" from the Freeport Bakery in Sacramento when I worked down town. They were a real treat. So almondy, so crispy and just slightly sweet. The perfect mid-morning pick me up. They were more than a cookie but not quite a pastry, existing on a culinary plane all their own. For many years I erroneously searched for "Almond Crescent" recipes but only turned up a variety of almond shortbread cookies. That wasn't it. I had forgotten that they were called "Almond Horns". Who wudda thunk? Then I discovered the G Bakes blog and Mandelhoernchen and found my long lost love. After exhaustive research on Mandelhoernchen and Almond Horns, I came up with the recipe below and it's a WINNER. Or at least I think it is, check it our for yourself.

On a side note, my daughter and I discovered only just last month that Whole Foods sells these in their bakery in the self service cookie case. Only they don't dip the ends in chocolate. Shame on you Whole Foods, leaving off the chocolate. But honestly, they're pretty good. I'll head back there to snap one up, fo show!

Saturday, January 18, 2014

Breakfast Muffin Parfaits


I have a confession to make: I like sweets for breakfast. Seriously, if there was no nutritional downside, I'd eat danish, muffins, pancakes with syrup, donuts, waffles and coffee cake for breakfast each and every day. I admit it,  I have a raging sweet tooth and breakfast is no exception. But there is a downside. Like mega calories, no protein, lots of sugar, etc., etc., etc.. So I don't eat those things, except for occasionally on the weekends. I still want them though and these last few months I've gotten in the bad habit of having a blended mocha for breakfast. Home made, and really not too terribly loaded with calories, about 250. But no nutritional benefit. Seriously, not a redeeming ingredient in them. They're just so tasty and convenient. I can sip on them while still going about my morning routine. Then two hours later I'm crazy hungry. This is not a good habit.

My bad breakfast is not a new realization, I've know it all along, it just got time to get real with myself and kick the habit. As much as I abhor New Year's Resolutions, after the nutritional debauchery of December, I resolved to start my days with a better breakfast. This recipe looked like a good start. Some decent nutritional value, portable (I can easily take it to work), convenient (make ahead on the weekends), easy (a pretty simple recipe) and still sweet. Check it out. . .

Wednesday, November 6, 2013

Mini Waffle Breakfast Sliders


I have a foodie confession: I like McDonald's Sausage Egg and Cheese McGriddle sandwiches. I know, they're gross. But, they'er not. Or at least not to me. I can take or leave most fast food breakfasts, but there's something about that warm thick fluffy maple flecked griddle cake that calls to me. And I can't resist the sweet savory combo when you add the sausage. Yummy! Or gross, or whatever. They are what they are. Like 'em or not.

Now that the weather has turned chilly here in my neck of the woods, I've been trying to come up with a quick, hot, breakfast on the go, for my kids. I've done breakfast sandwiches before. They're pretty good. I've done breakfast burritos, bunches of them to reheat in the AM. They're good too. I'll probably eventually make those before the winter's out. But I wanted to come up with something else. That's when my thoughts turned to my beloved McGriddle. You can see that these Mini Waffle Breakfast Sliders are a slightly healthier homage to the McGriddle. Give 'em a go.

Wednesday, October 23, 2013

Monte Cristo Sandwich


Last time we went to Disneyland we were robbed. Not literally, but robbed of our favorite sandwich, The Monte Cristo. We always get them at the Blue Bayou Restaurant. You know, the restaurant where it looks like you're sitting outside at night, even though you're inside in the middle of the day. The one that over looks the boats as they head off for Pirates of the Caribbean. We must, I say MUST, eat there every time we visit the Magic Kingdom. It's just tradition. It's just how it is. On our last trip I thought I'd be super duper clever and make reservations way ahead. So we wouldn't have to wait, so we could get a seat right on the water. On our last day in the park, we arrived 15 minutes before our 6:00pm reservation, requested a seat on the water and were seated at a lovely waterside table 20 minutes later. I was pretty pleased with myself. Then we opened our menus to discover, in horror, that the Monte Cristo isn't served at dinner. WHAT!!! Say it ain't so. I begged, pleaded and all but got on my hands and knees trying to convince the waiter to order the coveted sandwich for us but it just wasn't to be. We would leave the park without our beloved Monte Cristo. (We actually had a very nice dinner once we got over the absence of the sandwich.)

Still feeling robbed weeks later, I decided to try and make them at home. Traditionally, Monte Cristo sandwiches are deep fried. If you've read my post on Funnel Cakes, then you know how I feel about deep frying at home. YUCK, too messy. It's best left to professional chefs in professional kitchens. There must be another way. So I Googled, and Pinterested and found several grilled Monte Cristo sandwich recipes. I read through them, got the general idea, tweaked the proportions, meats and cheeses for our tastes and came up with the following recipe. I'm using our George Foreman grill which makes the whole process super easy but you can use a grill pan or skillet if you prefer. Check it out. . .

Sunday, August 18, 2013

Coffee Cake


Long since before I started this blog I've been on the hunt for a good old fashioned crumb topped coffee cake. I've tried several over the years. Either the cake is too dry or the crumbs are too hard or too sandy. Or too much crumb, or not enough crumb. Some include fruit, and although I'm sure they're delicious, I didn't want fruit. Just plain cinnamony coffee cake. And yes, I've posted Crumb Cake on this blog. But that's Crumb Cake and it's all about the crumb. This is coffee cake, and it's all about the cake. I'm sure you see the distinction. Don't ya? Please tell me you do. 
Anywho, I found this recipe and it looked promising. I was wary of the cream cheese layer, I didn't want a strong cream cheese tang to my cake. I was wary of the sour cream in the batter. Again the "tang" thing. Not that I don't like sour cream or cream cheese, I do, really, I just didn't want that for coffee cake. But the cake in the picture looked moist, and the crumbs looked just right and it had pecans. So, I gave it a try. . .

Tuesday, June 11, 2013

Neapolitan Pound Cake


A couple of months ago I copied this recipe for Sour Cream Pound Cake off the internet. I adore southern cooking and southern tradition and this recipe and accompanying story seemed rife with it. I stashed the hand written copy I'd made into my "to make" binder and waited for the opportune moment. Then months later, I stumbled across a picture on Pinterest and followed the link to Neapolitan Pound Cake. Hmmm. . .the gears started cranking. And soon enough, my mind was filled with visions of strawberry pink, vanilla and chocolate brown pound cake. 

I linked on over to the recipe from Pinterest but it had all kinds of ingredients that I'd have to go and buy (cake flour, mascarpone cheese, etc., etc.). Blech, too complicated. But the sour cream pound cake was simple. With just a few tweaks here and there, I could draw inspiration from both recipes and create one all my own. Or kinda. . .sorta. . .seriously, I'm not quite sure when I stops being "their" recipe and becomes "mine". So I'm linking over to all the recipes, trying, in good faith, to give credit where credit is due and keep my fingers crossed that no one sues me. Anywho. . .see how it turned out:

Sunday, May 19, 2013

Strawberries & Cream Scones


They say, "When life hands you lemons, make lemonade." But in my world, when life hands you an almost out of code carton of cream and some strawberries on their last days, you make Strawberries and Cream Scones. I really, really can't bare to throw out food. So when I ended up with a handful of strawberries that were a bit too old to just eat but really not bad, something had to be done. So I whipped up a batch of scones. I'm using my scone shortcut (a box of biscuit mix) because, well because it's easy, and I had it on hand. I also love a recipe that comes together out of necessity and I loved the fact that I made this work with what I had on hand. No extra trips to the store, believe me when I tell you, that doesn't happen often. This recipe is easy and straight forward so let's cut with the chit chat and get started. . .

Sunday, May 12, 2013

Apple Sharlotka


I saw this recipe on the Smitten Kitchen blog and new that I wanted to try it. It was quite a while ago and I've waited. Waited because my husband doesn't like cooked apples. That's right. No apple pie, no apple turnovers, nada, nichts, nothing. I've waited because there were birthday cakes to make and little league treats to bake. Waited because there's been house work to do, because I changed jobs, because time has a way of slipping by unnoticed while you're busy doing stuff. Finally, last week, I'd waited long enough. It was time to try this recipe or unbookmark it and let it go. So I tried it.

The rustic simplicity of the recipe and ingredients piqued my interest. Could such simple, dare I say "plain", ingredients deliver. Would the whole be greater than the sum of it's parts? Could you make a cake without butter? Could you make a pie without a crust? What would this be? Breakfast? Dessert? I had to find out. . .

Sunday, March 17, 2013

7Up Biscuits


Up until recently, and when I say recently, I mean last week, I've kind of looked down on Bisquick. I've kind of been a snob about it. I had a tude. The roots of my disdain lie in my childhood. As I've mentioned before, my mom didn't like to cook. She was a good cook, when she wanted to be, but she just didn't enjoy it. So, any way that she could find a shortcut, she did. And so Bisquick was a big player in her kitchen. Not just for pancakes or biscuits, but for everything. Pie crust, cinnamon rolls, and a whole slew of "Impossible Pies". Lots of dishes had that buttermilk tang that you only get with Bisquick. So when I started exploring my love of cooking I vowed not to shortcut with Bisquick. Not this gal. No siree bob! I was a "real" cook, who used "real" ingredients. No short-cutted, Bisquick-tanged dishes for me. And a snob was born.

Then I saw these biscuits on Pinterest. There looked so fluffy, so tender, so moist. I just had to give the recipe a try. So, I linked on over to this blog:  http://janellescookbook.blogspot.com/2010/10/7-up-biscuits.html and imagine my shock when I saw the recipe used Bisquick. So, I overcame my snobbery, bought some Bisquick and decided to give it a go. . .

Sunday, August 26, 2012

Chocolate Chocolate Chip Waffles

. . . And An Appliance Review


If you've been reading this blog, then you know that I'm not a fan of appliances that only serve one function. The "One Trick Ponies" of the appliance world if you will. And, no offense to "Babycakes" but they seem to have a whole line of these "One Trick Ponies". Cake Pop Makers, Pie Pop Makers, Mini Donut Makers, Mini Cupcake Makers, the list goes on and on. Now I'm not faulting you if you have, use and like these machines. They do make light work of these treats. So if you have the counter, cabinet and/or wallet resources for these, and you enjoy them, knock yourself out. They just aren't for me. All that being said, you just can't make waffles without a waffle iron. So I concede my aversion to appliance single taskers in the case of the waffle iron. And . . . as Kohl's just happened to put all their "Babycakes" appliances on sale for $19.99, and . . . as I just so happened to have a 30% off coupon for  Kohl's, I embraced my hypocrisy and purchased the "Waffle Stick Maker". 

And . . . 
I . . . 
LOVE . . . 
IT! 
It's the 4th waffle iron I've owned and for whatever reason, it seems to work best out of them all. I've used it about 5 or 6 times now and am still loving it. First, I like that it makes the individual "sticks". They are easier for the kids, no knife and fork needed, just a quick dip in syrup and breakfast is a go. Also the turn around seems to be quicker. Less time waiting around for the next waffle, more waffle eating. It has a great non-stick surface*; I've not once oiled or sprayed it and not once have the waffles stuck. A quick wipe with a dry paper towel and it's clean. Lastly, it cooks evenly and the "ready" light actually indicates that the waffles are done. It doesn't have a temperature adjustment and it's orange (not my favorite color), but I don't mind. It works and that's what really matters. 

*I'm also not a big fan of non-stick cookware. I've read too many reputable articles that talk about the toxic off-gassing that can occur when non-stick gets too hot. No thank you, I'll stick to cast iron and stainless steel. But, since those surface temperatures are well above 400°F (which has been proven to happen on cooktops and in ovens) and the waffle stick maker's surface doesn't get nearly that hot, I'm ok with it in this scenario. You'll have to decide for yourself.


So enough about waffle irons, let's get to making some waffles. Up until this weekend I've been using the waffle recipe on the box of "Trader Joe's Buttermilk Pancake All Purpose Baking Mix" with a splash of almond extract (my secret ingredient, shhhh don't tell.) We love 'em. But this saturday was my baby girl's 15th birthday so I wanted it to be a little extra special. What's more special than Chocolate Chocolate Chip Waffles. YUM! I chose Alton Brown's recipe from the Food Network web site. I've had really good luck with many of Alton's recipes so I figured it was a good choice. It got good reviews but many said the cocoa was too overwhelming and they added extra sugar. Not so in my opinion. I made them just like the recipe except for the buttermilk substitution (see below). The whole fam loved these. Five stars all around. A quick dusting of powdered sugar was all they needed.

Sunday, July 15, 2012

Crumb Cake


When I say "Crumb Cake" I mean "CRUMB Cake". Seriously this recipe is all about the crumb. The cake is simply a way to deliver the crumbs and this cake delivers. This isn't a crumb topped coffee cake, it's Crumb Cake. Big, tender, moist, cinnamony crumbs on a thin lightly sweetened cake base. This is my "go to" recipe when I need a simple delicious breakfast treat. But don't be limited to breakfast. It would be great with coffee anytime of day. It's basic, simple to make and delicious. I hope you like it. 

Oh and just FYI, this isn't my recipe but I can't remember where I got it. Sooooo, if it looks familiar let me know. I totally want to give credit where credit is due.

Tuesday, June 26, 2012

Danish


I have a confession to make: I have a crush on Joe Pastry. He's my latest blog crush. It's just a "Blogger Crush", totally anonymous. I mean seriously, I'm a married woman. But I have been stalking his blog for the last month or two and I love it. Totally nuts and bolts pastry making basics. I pretty much want to make everything on his blog. Hey, maybe I could do one of those "Julie and Julia" things and blog about making stuff from his blog. Then someone could blog about reading my blog about making stuff from Joe Pastry's blog. Whoa, whoa, whoa. . .I'm kinda through the looking glass here. Kind of like one of those bathrooms where there is a mirror in front and one in back and you see infinite reflections of yourself. Whoa again, am I making any sense? I think I've had too much coffee today. YIKES! Anywho . . . check out Joe's blog. It has great step by step instructions, with pictures, and recipes for any and all pastry basics.

For my first attempt at one of Joe's recipes I decided to try and make Danish. I love danish, it's my favorite thing from the pastry case. Or should I say, I like good danish. The soggy plastic wrapped blobs from the bread aisle don't cut it. I like buttery, crispy danish. Coconut Custard is my absolute fave but I pretty much like them all, well, except for apple. Don't know why but I just don't really like apple danish. Anywho . . . again . . . boy I'm long winded today . . . check out how I did on my first attempt at a laminated dough . . .

Tuesday, February 21, 2012

Easy Lemon Poppy Scones


So as of late, I'm totally hooked on the PBS show Downton Abbey.  I'd heard some buzz about it and decided to check it out. One episode and I was sucked in. I'm just such an easy mark for period English pieces that this show is tailor made for me. Seriously, check it out. Funny thing is that since I've started watching, my inner monologue has developed a British accent. Go figure. I've also suddenly been wanting to have tea. I'm not actually a big tea drinker but I'm enamored of the tradition of taking a relaxing break in the afternoon and enjoying a treat. So, what would be more English that scones. I usually have coffee with mine but isn't that what us Yanks do, forgo tradition.

I'm showing you a super easy, shortcut, way to make scones. Using a boxed biscuit mix eliminates the whole "cutting in" mess with the butter. It's kind of cheating, I'll admit, but I'm also not going to lose any sleep over it. It just shortens up the process a bit and you'll be eating your scones that much sooner. I decided to make Lemon Poppy Scones because my dear neighbor brought me a big old bag of lemons. Lucky me! You can flavor them with whatever you like. Replace the lemon with orange and the poppy seeds with some dried cranberries or eliminate the lemon, poppy seeds and sugar, add parmesan cheese, garlic and basil for a savory dinner scone. The possibilities are endless, so, get to sconing. . .

Here's all you need: A box of biscuit mix, sugar, poppy seeds, heavy cream, a lemon (You are going to use the zest plus you need 4 tablespoons lemon juice, one medium sized lemon should be fine.) and powdered sugar.

In a large bowl, mix with a fork, just until combined, the biscuit mix, sugar, poppy seeds, lemon zest, 3 tablespoons lemon juice and heavy cream.

Turn it out onto a floured surface. It will be a crumbly mess. Knead it as little as possible, just until it comes together. 3-4 turns max.

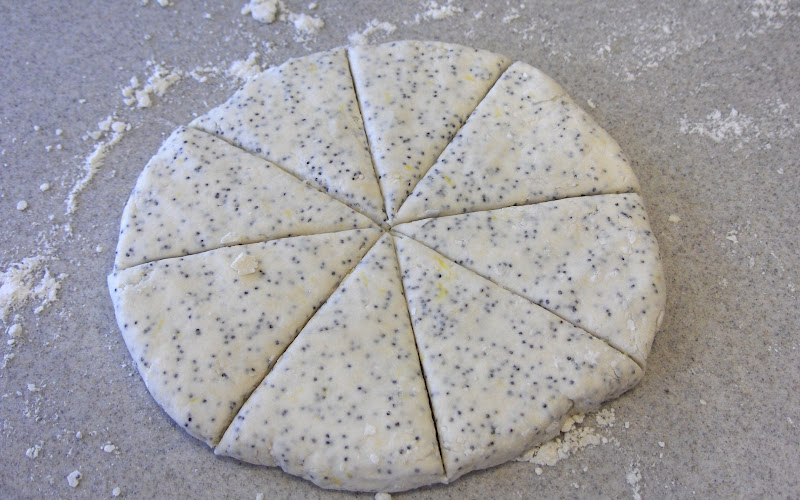
Then pat it into a circle that's 1/2 inch thick. The circle will be about 8 inches. Using a sharp knife cut the circle into 8 wedges. Separate the wedges and place them 1 inch apart on a Silpat lined cookie sheet. Bake for 8-10 minutes at 400°F until the tops just start to brown.

While the scones are baking, whisk together another tablespoon of lemon juice and 1/4 cup powdered sugar to make the glaze.

Remove the scones to a cooling rack set over some waxed paper. Let them cool about 5 minutes. These got a bit dark because I used a dark coated pan. I would suggest NOT using a dark coated pan and taking them out of the oven a bit earlier.

Spoon about 1 teaspoon of glaze over each scone and let a bit run over the sides.


And yep, it's that easy. Just one little shortcut and you can whip up a batch of scones anytime. You can use this method to make a variety of different flavored scones both sweet and savory. If you try savory, just leave out the sugar. Happy Sconing!


Easy Lemon Poppy Scones
1 8oz. box Jiffy Buttermilk Biscuit Mix*
3 T. sugar
1 T. poppy seeds
Zest of one lemon
1/2 C. heavy cream
3 T. lemon juice

Glaze:
1 T. lemon juice
1/4 C. powdered sugar

Preheat oven to 400°F.
In a large mixing bowl combine biscuit mix, sugar, poppy seeds and lemon zest. Stir to combine. Add heavy cream and 3 T. lemon juice and stir with a fork until just combined.  Turn out onto a floured surface and knead 3-4 times until dough comes together. Pat into a 1/2 thick circle and cut into 8 wedges. Separate and bake on a cookie sheet 8-10 minutes until just golden brown on the tops. Remove to a wire rack to cool.
For glaze, whisk together lemon juice and powdered sugar. Spoon 1 teaspoon over each scone allowing some to run over the sides. 
Makes 8 scones

* You can use an equal amount (by weight) of Bisquick or other all purpose baking mix.

Wednesday, February 8, 2012

Caramel Apple Pecan Pull Apart


I can't believe I've never made this before. It was so, so, so super easy. And delicious. I'm going to make it again and again and again. It was that easy and delicious.

I've heard of "Monkey Bread", know people who've made it and I've seen it for sale at the grocery store.  But, I've never been able to get past the name: Monkey Bread. Seriously, there isn't anything appetizing about Monkeys. Or maybe it's just me. I just don't think of food or eating when I think Monkey. It conjures other thoughts that, since this is a family friendly blog, I won't go in too. Enough said. So. . . I've renamed it "Pull Apart Bread". And that's all I've got to say about that.

Cinnamon and sugar are delicious together and I could have gone with the traditional formula but I wanted more. I searched several recipes and found one that had caramel. Ah, yes. . . but I still wanted more. Nuts? Yes! PECANS! My favorite nut. But I still wanted more.  Then looking at picture after picture of lumpy, cinnamony, sugary, Monk. . . Pull Apart Bread I couldn't help but think of apple fritters. Possibly the most unsung hero of the donut case. Yes! Apples. And so it was : Caramel Apple Pecan Pull Apart Bread. Win, win, win, win!

The players: Pecans (roughly chopped), apples (finely chopped), cinnamon, sugar, canned biscuits (Not the flakey kind, the cheapo kind.), brown sugar and butter.


Start by spraying a bundt or tube pan with Pam. Put about 1/3 of the pecans and apples in the bottom of the pan.


Mix together the cinnamon and sugar.


Open the biscuits and separate them. Roll each biscuit in the cinnamon-sugar.
Get 'em nice and coated.


Lay the biscuits in the pan.


After you have a layer of biscuits, add more apples and pecans sprinkling them around to the edges.


Keep layering until you use all the biscuits. The idea is to not be so neat and even with the biscuits. Just squish them in any old way.


Next melt the butter.


Then add the brown sugar and take it off the heat.


Stir it around until its all mixed together.


Then pour it over the biscuits. You can lift up a few biscuits here and then so it oozes through the cracks and crevices. I gave the pan a good whack or two on the counter to get the butter-brown sugar mixture to settle in. Then pop it into the oven.


Ohh, nice and golden brown.


Plop it out onto a serving plate. Then pull off delicious gooey chunks and enjoy.
Super easy, super good. Two things I love in a recipe.


Caramel Apple Pecan Pull Apart
1/2 C. chopped pecans
1 C. finely chopped apples
1/2 C. sugar
2 t. cinnamon
4 - 7.5 oz. cans biscuits (not the flakey kind)
6T. butter melted
3/4 C. brown sugar


Preheat oven to 350°F
Grease or spray a 12 cup tube or Bundt pan.
Sprinkle a third of the pecans and apples in the bottom of the pan.
In a small bowl, stir together the cinnamon and sugar. Separate the biscuits and roll each in the cinnamon sugar mixture to coat. Lay a single layer in the pan. Top with more apples and pecans. Then another layer of biscuits, squishing them around to fit. Continue layering until you have used all the biscuits.
Melt the butter and stir in the brown sugar. Pour over biscuits, lifting some up to allow mixture to seep around the biscuits.
Bake at 350°F for 40-45 minutes until golden brown. Turn out onto a plate and serve while warm.

Monday, January 23, 2012

King Cake (part deux)


I know I already posted King Cake, not quite a year ago, but my good friend Sue has just relocated from New Orleans and inspired me to revisit the King Cake with some changes. I also wanted to post a more timely recipe. Now is when you would traditionally serve this Mardi Gras treat. I'm no expert here, but according to Sue, in NOLA, they serve this on Fridays beginning on January 6th until Mardi Gras on February 21st. If you search "King Cake" on the internet there are thousands of versions, so who knows what is "authentic" or "traditional". It think it all depends on what you've grown up with or what they make at your neighborhood bakery. One thing they all do have in common is the three color decoration (Gold = Power, Green = Faith, Purple = Justice.). That's what really makes it a "King Cake". Beyond that, it's a sweet, breakfasty bread/cake, filled with any combination of flavors.

This time, again, I started with Gesine's King Cake recipe found here. I replaced the maple syrup with honey because I wanted a more neutral sweet flavor to the dough. I reduced, and slightly tweaked, the quantities (by about 25%) for a slightly smaller cake. (If you remember last time the finished cake was HUGE!). And lastly, I swapped out the bourbon/cinnamon pastry cream with lemon filling. Really, Gesine's pastry cream filling was absolutely delicious, I just wanted to try something different as well as reduce the steps and ingredients. I was pretty pleased with the results. I'd just do a few things different. The lemon pie filling worked well, but I like a really tangy lemon flavor, so I'd probably use a good quality lemon curd or make my own. I also think I slightly over baked my cake. It should be a more golden brown, mine is a bit dark. I will definitely make this again and my head is swimming with different filling ideas, cream cheese among them. I'll warn you his recipe is pretty step intensive and takes the better part of a day to finish, but it's a great opportunity to learn how to work with yeasted doughs. Laissez les bon temps roulez!

Here is what you need for the cake: bread flour (King Arthur is the best!), instant yeast (I always use SAF.), salt, honey, eggs (only 2, not 3.), whole milk, a lemon for the zest, vanilla paste or extract (Try to find the paste!), butter and lemon filling (Next time I'll probably use lemon curd because I like a pretty tangy lemon filling, but the filling works too.) You need a few more things for decorating and icing but we'll get to that later.

Start by stirring together the flour, salt and yeast. Use your mixer with the dough hook.

In a separate bowl whisk together the honey, eggs, milk, lemon zest and vanilla paste. I usually start by adding the eggs to the honey and getting them well mixed then slowly whisking in the milk and adding the lemon zest and vanilla last. If you dump it all together and then try to mix it you end up with a globby lump of honey on the bottom.

Add the wet ingredients to the dry and stir just to combine. Then, with the mixer going, slowly add bits of the softened butter.

Speed the mixer up and let it go until the dough pulls from the side of the bowl and is shiny and elastic. This can take up to 10 minutes. If the dough is very sticky add a bit more flour.

Proof in a well oiled, straight sided container until double in size. This will take at least an hour if not more. It took over 3 hours for me because it was a cold day. Be patient and don't try to rush it!

Once proofed and doubled in size, punch down dough and turn it out on a well floured surface.

Roll it out, flouring as needed, to a 13 x 20 inch rectangle.

Spread evenly with the filling, leaving an inch margin along the side closest to you.

Starting at the far side, roll up into a tight roll.

Pinch the edge to seal.

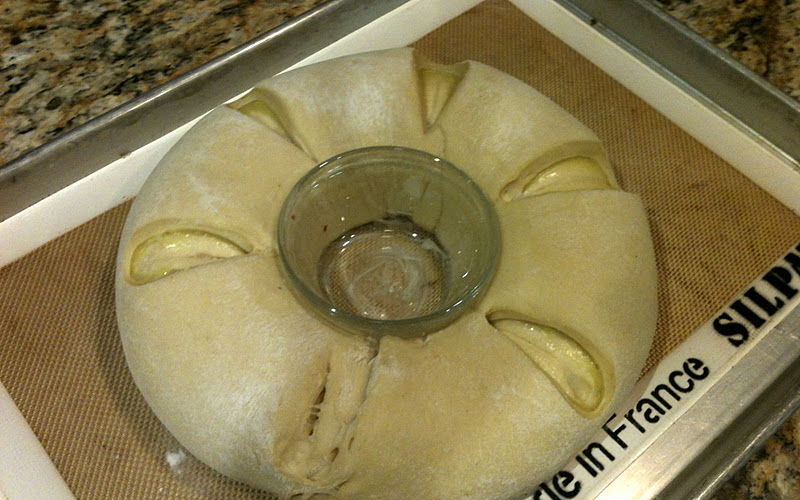
Generously butter (or line with a silpat mat) a rimmed baking sheet. Generously butter an oven-proof custard cup and form the dough into a ring around it with the seam side of the roll on the bottom. Pinch the ends together to seal. Make six evenly spaced slashes in the dough going through at least the first layer of dough.

Cover loosely and proof again until doubled in size.

For decorating you'll need one egg white beaten until loose and frothy and coarse colored sugar in gold/yellow, purple and green. Optionally you can use clear sugar.

Brush the ring with the egg white and sprinkle with alternating colors of sugar. Leave the custard cup in place for baking.

Bake in a preheated 350°F oven for about 30 minutes, just until light golden brown. I let this go a bit too long, it's just a tad dark. Using an oven mitt, remove the custard cup from the middle and let the cake cool on the pan.

To ice the cake whisk together 1 cup of powdered sugar and 1 to 2 tablespoons milk. It should be just runny enough to drizzle off a fork but not more. If you used clear sugar then divide the icing into 3 cups and color them yellow, green and purple.

Drizzle the icing over the cake using a fork. If you used clear sugar and colored icing, alternate the colors on the different sections of the cake.

Slice it up and enjoy. You could  pretty much fill this with any flavor you like. Apple, cherry, almond, cream cheese. The possibilities are endless. Give it a try!

King Cake
by Becky Elkins, adapted from Gesine Bullock-Prado

Dough:
3-3/4 C. bread flour (plus extra as needed)
1 T. instant yeast
1-1/2 t. salt
1/4 C. honey
2 eggs
1-1/4 C. whole milk
zest of 1 small lemon
2-1/2 t. vanilla bean paste
3 t. unsalted butter at room temperature

Filling:
12-14 oz. lemon pie filling or lemon curd

Decoration:
1 beaten egg white
Coarse Sugar (preferably colored yellow/gold, green and purple)

Icing:
1 C. powdered sugar
1-2 T. milk
(optional food color in yellow, green and purple)

For the dough:
Place flour, yeast and salt into the bowl of an electric mixer fitted with the dough hook attachment.  Stir the dry ingredients together.  Whisk together the honey, eggs, milk, lemon zest and vanilla bean paste.
With the mixer on low, add the wet ingredients.  When the wet ingredients are just combined, slowly add bits of the butter.  Mix the dough until it starts to pull from the sides of the bowl and is very shiny.  If the dough is very sticky, slowly add extra flour.  The mixing process can take quite a while, up to 10 minutes. Proof the dough in a straight sided container, sprayed with non-stick spray, until the dough doubles in size. (about 1 to 1-1/2 hours)

Assembly:
Generously butter a rimmed sheet pan or line with a silpat mat. Punch dough down and roll out, on a generously floured surface, into a 13x20 inch rectangle. (dough should be just under 1/4 inch thick.) Spread filling evenly over dough, leaving a 1/2-inch margin on the long side, closest to you. Roll up, in a tight roll, starting with the long side farthest from you and rolling towards you, brushing off excess flour as you go. Pinch the seam to seal. Form roll into a ring on rimmed sheet pan. To help ring hold shape, place a generously buttered ovenproof custard cup in the center of the dough ring. Make 6 evenly spaced slashes around the ring. Cover loosely and let rise again until doubled in size. (about 1 hour) Preheat oven to 350°F. Brush lightly with one beaten egg white and sprinkle with alternating colors of sugar.  Bake for 30 minutes until golden brown. Let cool.

For the icing:
Whisk together the sugar and milk until smooth. Use a fork to drizzle icing over cake.

Alternate decoration: If you don't have colored sugar, brush ring with egg white and sprinkle with coarse sugar. After baking, separate icing into three bowls coloring one yellow, one green and one purple. Then drizzle icing in alternating sections of the cake. (Green, yellow, purple, green, yellow. . .)