Showing posts with label Snacks. Show all posts

Tuesday, September 4, 2012

Caramel Pecan Popcorn


A funny thing happened on the way to make Caramel Corn. I didn't have any light corn syrup. Seriously, how could I be out of light corn syrup. I always have some. Better put it on the grocery list. What I did have is 3 bottles of dark corn syrup. Why? Don't ask me. I must have forgot I had some and then bought more. Then I thought: "Can you make caramel corn with dark corn syrup?" Why not? Then dark caramel corn made me think of Pecan Pie. Mmmmmm, Pecan Pie! Wait . . . hold on . . . I'm getting an idea . . . Caramel Pecan Popcorn! Yes, I always have pecans. I double checked the freezer and there they were. So Caramel Pecan Popcorn it is!

Sunday, July 1, 2012

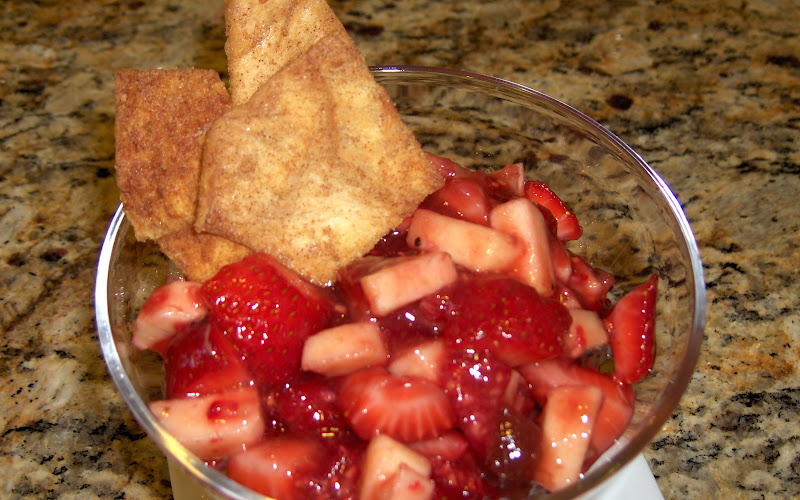
Fruit Salsa


This is the perfect appetizer for 4th of July. It's simple, delicious and guilt free. Well, ok, it does have sugar but it also has lots of fresh fruit. Oh and it's pretty. Bright red and shiny. Perfect for your next BBQ. I love to bring this to our friend's houses because it's unexpected. It totally outshines the standard old cut fruit platter but still brings fruit to the party. Why risk being another creamy chip and dip offering, go for the fruit. 

And I have to give a shout out to my friend Tabetha. Years ago she hosted a recipe exchange and this (her recipe) is one of the recipes I walked away with and have used again and again. I hope you will to. Thanks Tabetha!

Monday, March 12, 2012

Homemade Soft Pretzels


This little gem of a recipe has lay dormant in my recipe book for a couple of years now. I hadn't made these in so long. I really don't know why. They are great. Simple and basic but great. Homemade Soft Pretzels. Dark, chewy and salty on the outside, soft and warm on the inside. The perfect snack on a rainy day. I rediscovered these last week in trying to come up with a hearty snack for my daughter. 

At fourteen, a high school freshman, my daughter joined the school swim team. She's never swam competitively before and I admire her courage in trying something totally new. Seriously, you go girl! I'm happy to report that she's doing great. And might I add, what a great group of kids these swimmers are. Full of fun, encouragement and positive energy. A credit to their generation. Anywho . . . about the pretzels. . . For the first home swim meet I wanted to bring S a special treat for her and her swim buddies. But, not cookies, or a sugary treat. Something not quite so unhealthy but something that was special, out of the ordinary and duh, delicious. I went flipping through my recipe binder and happened upon the Pretzel recipe. PERFECT! Special, I don't make these everyday, but not sugary and sweet. The girls loved them and I'm sure you will too. Give 'em a try. . .

(This recipe is Alton Brown's and can be found on the Food Network web site. It's always turned out so well that I've never fiddled with the recipe. Some things are best left as is. The recipe link is at the end.)

Tuesday, June 7, 2011

Muddy Buddies®/Puppy Chow

This fun snack goes by a couple of names. Officially it's called Muddy Buddies® but that name is a ® (registered trademark) so I don't think I can call it that. Hmmmm, not sure what the rules are. (Any lawyers out there? Can ya help a girl out?) Only I don't like calling it "Puppy Chow" because it seems to imply that your dog could eat it which is a big NO NO. It has chocolate and will make your pooch pretty sick. Also, we're not dogs (or puppies), so I don't want to eat something called "Puppy Chow". But whatever you want to call it, it's good, kids love it, and as sweet treats go, it's not too bad, us mom types don't have to feel too guilty about serving it. To be honest, I'm not a huge fan, I'm just not that into peanut butter. I don't dislike it, I just don't really like it. Kind of a "take it or leave it" thing. But my kids, their friends, my husband, and most people I know, like it. It's super easy to make and a great recipe for kids to whip up on their own. It has just a few simple ingredients which most likely you already have and doesn't involve the stove top or oven. (Just the microwave) So whatever you want to call it, make up a batch next time you need to feed a crowd. The full recipe can be found on either the Chex or Betty Crocker web sites. Go get it!

You probably have all this in your pantry right now: Chex cereal (any variety, I like the rice), chocolate chips, peanut butter, butter, vanilla and powdered sugar.

Start by measuring out the cereal into a really big bowl.
 Just so's ya know, my 13 year old made this recipe, I just took pictures. 
That's her lovely hand.

Next add the chocolate chips, peanut butter and butter to a microwave safe bowl and microwave on high for 1 minute.

Give it a stir and continue to microwave, 30 seconds at a time, until it's all melted together and smooth.

Add the vanilla and stir in well.

Pour the chocolate-peanut butter mixture over the cereal and mix well. At first it doesn't seem like it will coat all the cereal but just keep gently mixing. (be careful not to crush the cereal). Try to find all those pesky hidden globs of chocolate and get them all mixed in good.

Nice, all coated and ready for more sugar. Yea!

Dump the powdered sugar into a large zipper storage bag. This is a gallon bag but if you have something bigger I recommend it. This bag was a tad small and we had to do then next step in two parts.

In goes the cereal mixture (for us, just half).

Now give it a good shake. Really shake it up baby. 
(OK, sorry that was pretty cheesy but I couldn't resist)

Lastly spread it out on a rimmed cookie sheet and let it dry/set up. Then store in another (clean) zipper bag or other air tight container.

This would be great for a pool party or post soccer/baseball game treat. Here are the recipe links again:  Chex,  Betty Crocker

Monday, March 21, 2011

Zombies!


What the heck is a Zombie? We'll if you went to my High School it's just a little piece of heaven. OK, let's back it up. . . Two years ago when I finally caught up with the world and joined Facebook, I posted some old pictures from High School. That of course invited a lot of comments, one in particular that mentioned the Zombie. Wow, I hadn't thought of those in years. A warm, soft, slightly sweet roll filled with melted cheese. Oh how I loved them and how I faithfully ate one everyday. Needless to say the comment had me craving the Zombie. I scoured the web looking for recipes. Certainly I couldn't be the only one in search of this culinary delight. But alas, I couldn't find a recipe that matched the deliciousness that I remembered. I found a few that were close, so I tweaked, fiddled, modified and experimented until I finally did it. Or at least I think I did. I posted the recipe on Facebook and my old high school chum Richard was brave enough to give it a try. The reviews were in, he liked 'em, his kids like 'em. Eureka! I did it. And now Richard and I have introduced a whole new generation to the Zombie. Join us!

Here is what you need: Yeast (I always you SAF-Instant, just works for me.), AP flour, sugar, salt, softened butter, an egg and processed American cheese. I know, I know, I normally shy away from the processed stuff but for the true authentic Zombie experience you really need to use it. The slices work great but I actually prefer Velveeta. If you just can't bring yourself to use it, go ahead and use your favorite cheese.

Preheat your oven to 170°F. When it comes up to temperature, turn it off and keep the door closed. Next you'll need 1 cup of warm (110°F) water. Use a thermometer, you don't want it too hot. Believe me, I've had my fair share of troubles with killing yeast, only you don't find out until it's too late. So again, check that temp!

Gently stir the yeast in, set it aside and let it dissolve.

Add the flour, sugar, salt and butter to the bowl of a stand mixer fitted with a dough hook. Give the yeast a stir and add it as well.

Mix on medium speed for 7-10 minutes until you have a soft pliable dough.
This is NOT soft and pliable.

This IS soft and pliable. Now turn the mixer off, form the dough into a smooth ball and let it rest. A good 5 minutes or more. Set a timer. Don't rush it!

While your dough is resting divide your cheese into 8 1-1.5 oz. portions. If you are using slices, each is about 1 oz. so I used 1-1/2 slices of cheese per Zombie.

Once it has rested A GOOD SOLID 5 MINUTES, flatten the ball of dough and divide it into 8 equal portions.

Form each portion into a ball and then into a flattened disk. Place one portion of cheese in the middle.

 Stretch and pull the dough around the cheese pinching to seal it in. Really really pinch it good, you don't want any of that cheese leaking out.

Finish the rest of the dough the same way and place the Zombies pinched side down on a parchment or Silpat lined baking sheet.

Put them in the warm, but turned off, oven for about an hour until they are doubled in size. I like to prop the oven door open so it isn't too warm. Just nice and cozy so that the yeast can do its thing.

After an hour they are fluffy and twice as big. Yea! Take them out of the oven and preheat it to 350°F.

Beat the egg with 1 teaspoon of water and lightly brush the tops. This gives the Zombies a nice shiny golden brown color. You can skip it if you don't like shiny brown tops but I do. Makes me feel all warm and fuzzy inside. 

Once the oven is up to temperature in they go for 15-20 minutes until they're nice and golden brown. See those nice shiny tops. Pretty!

They're best served hot and fresh from the oven but will save for a day or two. Just reheat them in the microwave for about 30 seconds to get the cheese melty. Mmmmm, comfort food. They also go great with soup for lunch.

Cheese Zombies
Makes 8

1 C. warm (110°F) water
1 "rounded" T. yeast (I use "Saf-Instant" available at King Arthur.com)
3 C. All Purpose flour
2 T. sugar
1 t. salt (I always use Kosher)
2 T. butter softened (I used unsalted, if you use salted, reduce salt to 3/4 t.)
8-12 oz. processed American cheese (see note below*)

1 egg beaten
1 t. water

1.   Preheat oven to 170°F. When oven comes to temperature turn off and leave 
      the oven door closed.
2.   Gently stir yeast into 1 C. warm water and set aside.
3.   Add flour, sugar, salt and butter to the bowl of a Kitchen Aid mixer fitted 
      with the dough hook.
4.   Give the yeast a stir to make sure it is dissolved and add to the mixing bowl.
5.   Mix for 7-10 minutes until dough is soft and pliable. Let rest for AT LEAST 5 minutes.
6.   Divide dough into 8 equal pieces. Flatten each piece into a disk and place 
      1 to 1-1/2 oz. cheese in the center of each disk. Pull up dough around cheese and 
      pinch WELL to seal.
7.   Place Zombies seam side down on a parchment or Silpat lined baking sheet.
8.   Proof in preheated (but turned off) oven for 1 hour. Leave oven door ajar. 
      Zombies should double in size.
9.   Remove Zombies from oven and preheat oven to 350° F.
10. Mix beaten egg with 1 t. water and brush tops of zombies with mixture.
11. Bake Zombies in 350°F oven for 15-20 minutes until golden brown. Serve warm.

*NOTE: For a true authentic Zombie flavor and texture you need to use Processed American Cheese. (Velveeta or the like). You can use any cheese you like but only the processed cheese will melt smoothly.